PY32F0xx HAL Documentation
Welcome to the PY32F0xx Hardware Abstraction Layer (HAL) documentation. This library provides a Rust-based hardware abstraction layer for the Puya Semiconductor PY32F0xx family of microcontrollers.


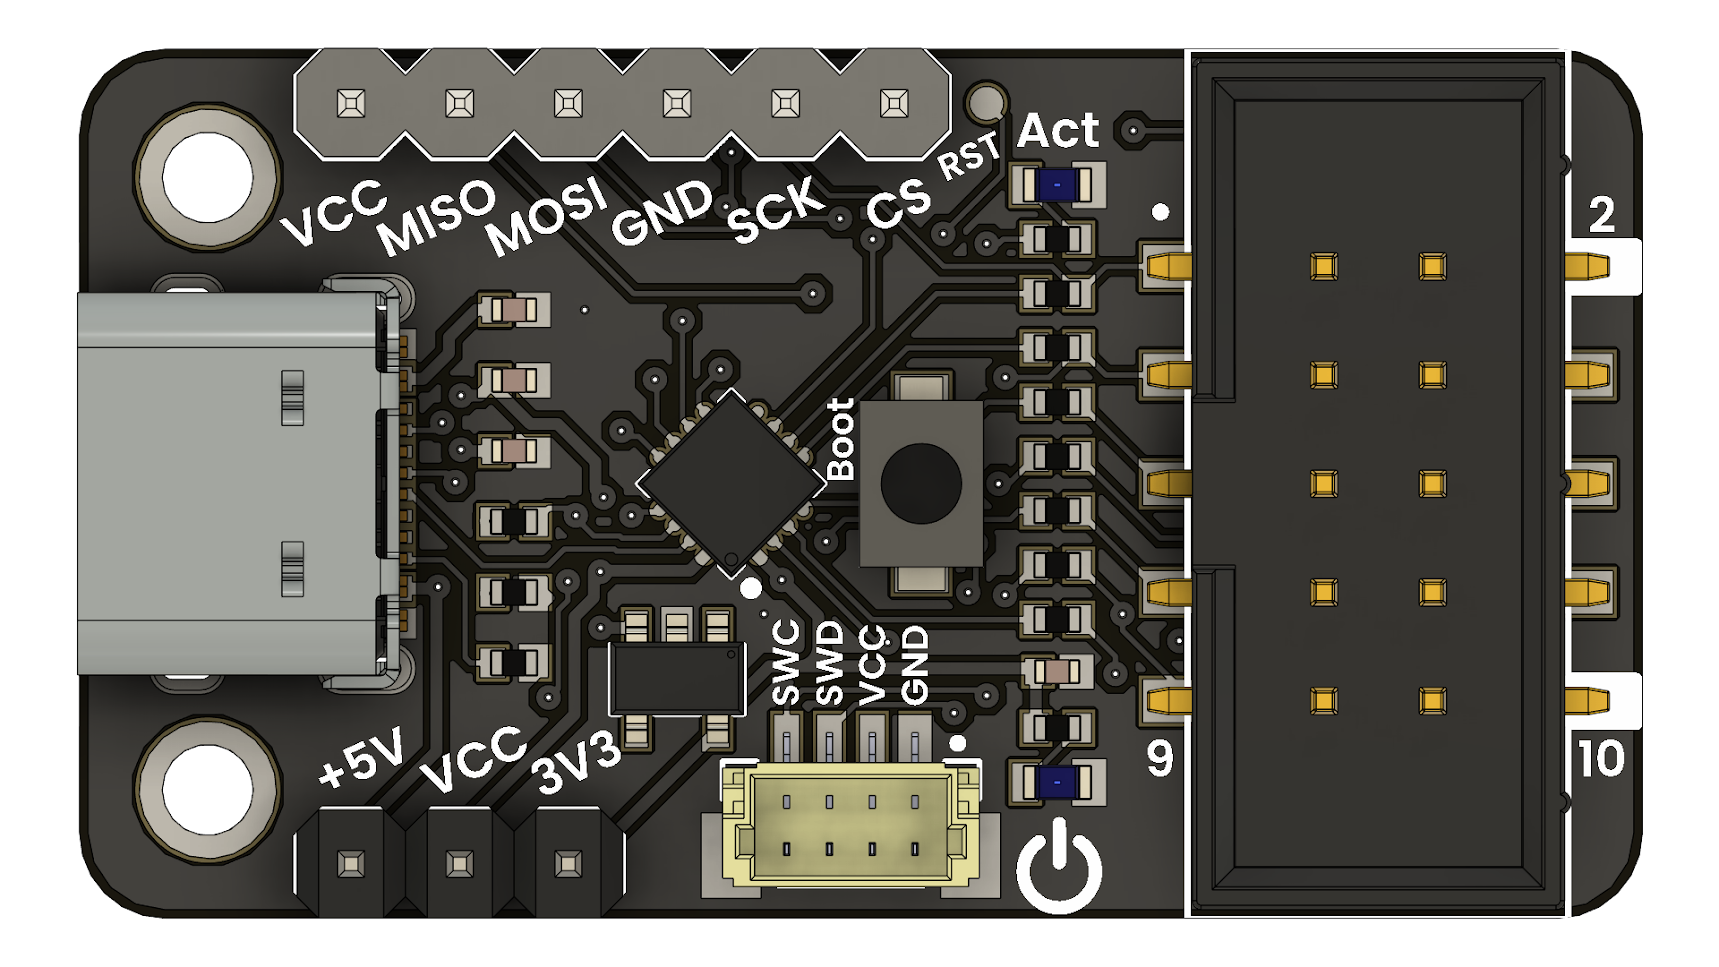
![]()
What is PY32F0xx?
The PY32F0xx family consists of low-cost ARM Cortex-M0+ based microcontrollers that offer an excellent alternative to STM32F0xx series. These MCUs are manufactured by Puya Semiconductor and provide:
- Low Cost: Extremely affordable microcontrollers
- ARM Cortex-M0+: Industry-standard 32-bit processor
- Rich Peripherals: USART, SPI, I2C, ADC, Timers, and more
- Small Packages: Available in compact packages like DFN8
- Wide Voltage Range: Typically 1.7V to 5.5V operation
Supported Devices
This HAL supports the following PY32F0xx device families:
- PY32F030 (16KB, 32KB, 48KB, 64KB Flash variants)
- PY32F003 (16KB, 32KB, 64KB Flash variants)
- PY32F002A (20KB Flash)
- PY32F002B (20KB Flash)
Key Features
- ✅ Type-safe GPIO with compile-time pin configuration
- ✅ Serial Communication (USART) with working examples
- ✅ ADC Support for analog measurements
- ✅ PWM and Timers for precise timing control
- ✅ SPI and I2C for device communication
- ✅ Real-time Clock (RTC) support
- ✅ DMA Support (on supported devices)
- ✅ Embedded HAL Compatibility for ecosystem integration
Working Examples
This documentation includes comprehensive examples that have been tested and verified on real hardware:
Verified Serial Examples
- Serial Echo - Basic USART2 communication
- Serial ADC - Advanced serial + ADC with command interface
Both examples work reliably on PY32F003I DFN8 package at 9600 bps.
What’s in This Documentation?
This book is organized into several sections to help you get started and become productive with PY32F0xx development:
- Getting Started - Set up your development environment and create your first project
- Device Guides - Device-specific information and configuration guides
- Examples - Step-by-step examples with working code
- Peripheral Drivers - Detailed documentation for each peripheral
- Troubleshooting - Solutions to common issues
- Reference - Technical reference materials
Getting Help
If you encounter issues or have questions:
- Check the Troubleshooting section
- Look for similar examples in the Examples section
- Review the Peripheral Drivers documentation
- Open an issue on GitHub
Contributing
We welcome contributions! Whether you’re fixing bugs, adding examples, improving documentation, or testing on new devices, your help is appreciated. See our Contributing Guidelines to get started.
Ready to begin? Start with the Quick Start Guide!
Quick Start Guide
This guide will get you up and running with PY32F0xx development using Rust in just a few minutes.
Prerequisites
Before you begin, ensure you have the following installed:
- Rust toolchain (1.70 or later)
- Python 3.7+ for flashing tools
- Git for version control
- A PY32F0xx development board or chip
1. Clone the Repository
git clone https://github.com/UNIT-Electronics-MX/py32f0xx-hal.git
cd py32f0xx-hal
2. Quick Setup
Run the setup script to configure your development environment:
./scripts/setup.sh
This script automatically:
- Adds the
thumbv6m-none-eabiRust target - Creates a Python virtual environment with PyOCD
- Verifies all required tools are available
Manual Setup (Alternative)
If you prefer to set up manually:
# Add Rust target for ARM Cortex-M0+
rustup target add thumbv6m-none-eabi

# Create Python virtual environment
python3 -m venv venv
source venv/bin/activate  # On Windows: venv\\Scripts\\activate
pip install pyocd

# Or use the Makefile
make setup-venv
3. Build Your First Example
Let’s build the classic “blinky” LED example using the simplified commands:
# Simple way - build blinky (default MCU: PY32F003x4)
make blinky

# Or specify MCU type explicitly
make EXAMPLE=blinky MCU_TYPE=PY32F003x4
New Simplified Commands:
make blinky- Build blinky examplemake serial_echo- Build serial examplemake pwm- Build PWM examplemake adc_values- Build ADC example
Available MCU types:
PY32F003x4- PY32F003 with 16KB Flash (default)PY32F003x6- PY32F003 with 32KB FlashPY32F003x8- PY32F003 with 64KB FlashPY32F030x4- PY32F030 with 16KB FlashPY32F030x6- PY32F030 with 32KB FlashPY32F030x7- PY32F030 with 48KB FlashPY32F030x8- PY32F030 with 64KB FlashPY32F002Ax5- PY32F002A with 20KB FlashPY32F002Bx5- PY32F002B with 20KB Flash
4. Flash to Your Device
Connect your PY32F0xx board via SWD and flash the firmware:
# Super simple - build and flash blinky
make flash-blinky

# Or with explicit MCU type
make flash EXAMPLE=blinky MCU_TYPE=PY32F003x4

# Alternative syntax
make example=blinky flash
5. Verify It Works
If everything is set up correctly, you should see:
- The LED on your board blinking
- No compilation errors
- Successful flashing messages
Quick Reference Commands
Get help anytime with:
make help          # Show quick command reference
make full-help     # Show complete help with all options
Most Used Commands:
make blinky        # Build blinky
make flash-blinky  # Build and flash blinky
make serial_echo   # Build serial example
make flash-serial_echo # Build and flash serial
make clean         # Clean build files
Next Steps
Now that you have a working setup, explore more examples with the simplified commands:
# Try the serial echo example
make flash-serial_echo

# Or the ADC example
make flash EXAMPLE=serial_adc

# PWM example
make flash-pwm

# List all available examples
make list-examples
Common Issues
Compilation Errors
If you get target-related errors:
rustup target add thumbv6m-none-eabi
Flashing Errors
If PyOCD can’t find your device:
- Check SWD connections
- Verify device is powered
- Try:
pyocd listto see connected devices
Permission Issues (Linux)
Add yourself to the dialout group:
sudo usermod -a -G dialout $USER
# Log out and back in
What’s Next?
- Read the Hardware Setup Guide for wiring details
- Explore Working Examples for code samples
- Check Device-Specific Guides for your chip
- Learn about Peripheral Drivers available
Need Help?
- Check the Troubleshooting Section
- Review Verification Guide
- Open an issue on GitHub
Hardware Setup
This guide covers the hardware setup requirements for PY32F0xx development, including wiring, programmer connections, and common pin configurations.
Development Hardware
Minimum Requirements
- PY32F0xx Microcontroller - Any supported variant
- SWD Programmer - Multiprotocol Programmer, ST-Link v2, J-Link, or compatible
- Power Supply - 3.3V (or 1.7V-5.5V depending on variant)
- Breadboard/PCB - For prototyping connections
Recommended Setup
- Development Board with built-in SWD programmer
- Oscilloscope/Logic Analyzer for debugging
- Multimeter for voltage verification
- LED and resistor for basic output testing
SWD Programming Connections
All PY32F0xx devices support Serial Wire Debug (SWD) for programming and debugging.
Standard SWD Pinout
| SWD Signal | PY32F0xx Pin | Description |
|---|---|---|
| SWDIO | PA13 | Data line |
| SWDCK | PA14 | Clock line |
| NRST | NRST | Reset (optional) |
| GND | GND | Ground |
| VCC | VCC | Power (3.3V) |
Wiring Example (ST-Link v2)
Multiprotocol      PY32F0xx
-------------      --------
SWDIO        <--> PA13
SWDCK        <--> PA14
GND          <--> GND
3V3          <--> VCC
RST          <--> NRST (optional)
Package-Specific Pin Configurations
DFN8 Package (PY32F003I)
The DFN8 is a compact 8-pin package commonly used for space-constrained applications.
            DFN8 Pinout (Top View):
               VCC  1 ┌─────┐ 8  PB5/LED
               PA0  2 │     │ 7  PA14-SWDCK/PB6
               PA1  3 │     │ 6  PA13-SWDIO/PA10
               PA2  4 └─────┘ 5  PB0/PF2-NRST
Verified DFN8 Configuration
This configuration is tested and working on PY32F003I DFN8:
| Pin | Function | Description |
|---|---|---|
| PA0 | USART2 TX (AF9) | Serial transmit |
| PA1 | USART2 RX (AF9) | Serial receive |
| PA2 | ADC Channel 2 | Analog input |
| PB5 | GPIO Output | Debug LED |
| PA13 | SWDIO | Programming |
| PA14 | SWDCK | Programming |
Power Supply Considerations
Voltage Requirements
- PY32F002: 1.7V - 5.5V
- PY32F003: 1.7V - 5.5V
- PY32F030: 1.7V - 5.5V
Power Connections
Power Rails:
VCC/VDD  --> Main power supply (3.3V recommended)
VDDA     --> Analog power (connect to VCC)
VSS/GND  --> Ground (0V)
VSSA     --> Analog ground (connect to GND)
Decoupling
Always include decoupling capacitors:
- 100nF ceramic close to each VCC pin
- 10μF tantalum/electrolytic for bulk decoupling
- 100nF ceramic between VDDA and VSSA
Clock Configuration
Internal Oscillators
PY32F0xx devices have built-in oscillators:
- HSI: 8MHz internal RC oscillator (default)
- LSI: ~40kHz internal low-speed oscillator
External Crystals (Optional)
For applications requiring precise timing:
- HSE: 4-32MHz external crystal
- LSE: 32.768kHz external crystal for RTC
HSE Crystal Connections:
OSC_IN   --> Crystal + 12-22pF capacitor to GND
OSC_OUT  --> Crystal + 12-22pF capacitor to GND
Common Test Circuits
Basic LED Test
PB5 --> 330Ω resistor --> LED --> GND
Serial Communication Test
PA0 (TX) --> RX of USB-to-Serial adapter
PA1 (RX) <-- TX of USB-to-Serial adapter
GND      --> GND of USB-to-Serial adapter
ADC Input Test
PA2 --> 10kΩ potentiometer --> GND
        (center tap to PA2)
Troubleshooting Hardware Issues
Programming Issues
-
Can’t connect to device
- Check SWD wiring (SWDIO, SWDCK, GND)
- Verify power supply (3.3V)
- Try different SWD frequency
-
Device not responding
- Check NRST connection
- Verify crystal oscillator (if using HSE)
- Try holding NRST low during connection
Runtime Issues
-
LED not blinking
- Check LED polarity and current-limiting resistor
- Verify GPIO configuration in code
- Measure voltage on GPIO pin
-
Serial not working
- Check baud rate (9600 default)
- Verify TX/RX wiring (not crossed)
- Test with known-good USB-to-Serial adapter
-
ADC readings incorrect
- Check VDDA connection
- Verify input voltage range (0-VDDA)
- Check reference voltage configuration
Safety Guidelines
- Never exceed maximum voltage ratings
- Use current-limiting resistors with LEDs
- Double-check power supply polarity
- Avoid ESD damage - use anti-static precautions
- Keep connections short for high-frequency signals
Next Steps
Once your hardware is set up:
- Follow the Development Environment guide
- Try the First Program tutorial
- Explore Working Examples
Development Environment Setup
This guide covers setting up your development environment for PY32F0xx embedded development using Rust.
Prerequisites
Required Software
- Rust Toolchain (1.70.0 or later)
- Python 3.7+ (flashing tool)
- Git (for version control)
- Text Editor/IDE (VS Code recommended)
Optional but Recommended
- OpenOCD (alternative to PyOCD)
- GDB (for debugging)
- Logic Analyzer/Oscilloscope (for hardware debugging)
Installing Rust
Linux/macOS
# Install Rust via rustup
curl --proto '=https' --tlsv1.2 -sSf https://sh.rustup.rs | sh

# Restart shell or source environment
source ~/.cargo/env

# Verify installation
rustc --version
cargo --version
Windows
- Download and run rustup-init.exe
- Follow the installation wizard
- Restart command prompt
- Verify with
rustc --version
Add ARM Target
# Add Cortex-M0+ target (required for PY32F0xx)
rustup target add thumbv6m-none-eabi

# Verify target is installed
rustup target list | grep thumbv6m-none-eabi
Installing PyOCD
PyOCD is the recommended flashing and debugging tool for PY32F0xx devices.
Using pip (Recommended)
# Install PyOCD system-wide
pip install pyocd

# Or create virtual environment (recommended)
python3 -m venv py32-env
source py32-env/bin/activate  # Linux/macOS
# py32-env\\Scripts\\activate.bat  # Windows
pip install pyocd
Verify Installation
# Check PyOCD version
pyocd --version

# List supported devices (should include py32f0xx)
pyocd list --targets | grep py32

# Test SWD connection (with device connected)
pyocd list
Setting Up the Project
Clone Repository
git clone https://github.com/UNIT-Electronics-MX/py32f0xx-hal.git
cd py32f0xx-hal
Quick Setup Script
# Run the provided setup script
./scripts/setup.sh
This script will:
- Verify Rust installation
- Add ARM target if missing
- Create Python virtual environment
- Install PyOCD
- Verify all tools
Manual Setup
If you prefer manual setup:
# Ensure ARM target is available
rustup target add thumbv6m-none-eabi

# Create and activate Python environment
python3 -m venv venv
source venv/bin/activate

# Install PyOCD
pip install pyocd

# Verify build works
make build EXAMPLE=blinky MCU_TYPE=py32f003xx4
IDE Configuration
VS Code (Recommended)
Install recommended extensions:
# Install VS Code extensions
code --install-extension rust-lang.rust-analyzer
code --install-extension ms-vscode.cpptools
code --install-extension marus25.cortex-debug
Recommended VS Code Settings (.vscode/settings.json):
{
    \"rust-analyzer.cargo.target\": \"thumbv6m-none-eabi\",
    \"rust-analyzer.checkOnSave.allTargets\": false,
    \"rust-analyzer.cargo.allFeatures\": false,
    \"rust-analyzer.cargo.features\": [\"py32f003xx4\"]
}
Launch Configuration (.vscode/launch.json):
{
    \"version\": \"0.2.0\",
    \"configurations\": [
        {
            \"name\": \"Debug PY32F0xx\",
            \"type\": \"cortex-debug\",
            \"request\": \"launch\",
            \"servertype\": \"pyocd\",
            \"cwd\": \"${workspaceRoot}\",
            \"executable\": \"target/thumbv6m-none-eabi/debug/examples/blinky\",
            \"device\": \"py32f003xx4\",
            \"svdFile\": \"tools/Misc/SVD/py32f003xx.svd\"
        }
    ]
}
Other IDEs
CLion/IntelliJ IDEA:
- Install Rust plugin
- Configure Rust toolchain
- Set target to
thumbv6m-none-eabi
Vim/Neovim:
- Install rust-analyzer LSP
- Configure for embedded development
Hardware Setup
Programmer Connection
Connect your SWD programmer (ST-Link v2, J-Link, etc.):
Programmer    PY32F0xx
----------    --------
SWDIO      ←→ PA13
SWDCK      ←→ PA14
GND        ←→ GND
3V3        ←→ VCC
RST        ←→ NRST (optional)
Test Hardware Connection
# Activate Python environment if using one
source venv/bin/activate

# Check if device is detected
pyocd list

# Should show something like:
# 0 => ST-Link v2 [STM32F103C8T6]
Building Your First Project
Test Build
# Build the blinky example
make build EXAMPLE=blinky MCU_TYPE=py32f003xx4

# Should complete without errors
Flash and Test
# Simple way - flash blinky (uses PY32F003x4 by default)
make flash-blinky

# Or explicit way
make flash EXAMPLE=blinky MCU_TYPE=PY32F003x4

# LED should start blinking
Development Workflow
Typical Development Cycle
- Edit Code - Modify examples or create new ones
- Build -
make build EXAMPLE=your_example MCU_TYPE=py32f003xx4 - Flash -
make flash EXAMPLE=your_example MCU_TYPE=py32f003xx4 - Test - Verify functionality on hardware
- Debug - Use GDB/PyOCD for troubleshooting
Project Structure
py32f0xx-hal/
├── .vscode/             # VS Code configuration
│   ├── settings.json    # Rust Analyzer settings
│   ├── launch.json      # Debug configuration
│   ├── tasks.json       # Build tasks
│   └── extensions.json  # Recommended extensions
├── src/                 # HAL source code
├── examples/            # Example applications
├── docs/                # This documentation
├── tools/               # Development tools
├── scripts/             # Build and setup scripts
├── Cargo.toml           # Rust dependencies
├── memory.x             # Memory layout
└── Makefile            # Build automation
Creating New Examples
# Copy existing example
cp examples/blinky.rs examples/my_project.rs

# Edit the new file
# Build and test
make build EXAMPLE=my_project MCU_TYPE=py32f003xx4
make flash EXAMPLE=my_project MCU_TYPE=py32f003xx4
Debugging Setup
GDB with PyOCD
Start PyOCD GDB server:
# Terminal 1 - Start GDB server
pyocd gdbserver --target py32f003xx4

# Terminal 2 - Connect GDB
arm-none-eabi-gdb target/thumbv6m-none-eabi/debug/examples/blinky
(gdb) target remote localhost:3333
(gdb) load
(gdb) break main
(gdb) continue
VS Code Debugging
- Set breakpoints in code
- Press F5 (Start Debugging)
- VS Code will build, flash, and start debug session
- Step through code, inspect variables
Environment Variables
Useful environment variables for development:
# In your ~/.bashrc or ~/.zshrc
export PY32_TARGET=py32f003xx4
export PY32_PROGRAMMER=pyocd

# Use in commands
make build MCU_TYPE=${PY32_TARGET}
Troubleshooting
Common Issues
"thumbv6m-none-eabi" target not found:
rustup target add thumbv6m-none-eabi
PyOCD not found:
# Ensure Python environment is activated
source venv/bin/activate
pip install pyocd
Permission denied on Linux:
# Add user to dialout group
sudo usermod -a -G dialout $USER
# Log out and back in
Build failures:
# Clean and rebuild
make clean
make build EXAMPLE=blinky MCU_TYPE=py32f003xx4
Getting Help
- Check Troubleshooting section
- Review Hardware Setup
- Open issue on GitHub with:
- OS and versions
- Complete error messages
- Steps to reproduce
Next Steps
Once your environment is set up:
- Try Your First Program tutorial
- Explore Examples to learn the HAL
- Read Hardware Setup for wiring details
- Check Peripheral Documentation for advanced usage
VS Code Configuration
The project includes pre-configured VS Code settings for optimal Rust development:
Recommended Extensions
Install these VS Code extensions for the best development experience:
# Core Rust development
code --install-extension rust-lang.rust-analyzer
code --install-extension ms-vscode.cpptools

# Debugging support
code --install-extension marus25.cortex-debug
Settings Configuration
The project includes .vscode/settings.json with optimized settings:
{
    "rust-analyzer.cargo.target": "thumbv6m-none-eabi",
    "rust-analyzer.checkOnSave.allTargets": false,
    "rust-analyzer.cargo.allFeatures": false,
    "rust-analyzer.cargo.features": ["py32f003xx4"]
}
This configuration:
- Sets the correct target for embedded development
- Optimizes analysis for faster performance
- Uses the right features for your MCU
Debug Configuration
The project includes .vscode/launch.json for debugging:
{
    "version": "0.2.0",
    "configurations": [
        {
            "name": "Debug PY32F0xx",
            "type": "cortex-debug",
            "request": "launch",
            "servertype": "pyocd",
            "cwd": "${workspaceRoot}",
            "executable": "target/thumbv6m-none-eabi/debug/examples/blinky",
            "device": "py32f003x4",
            "svdFile": "tools/Misc/SVD/py32f003xx.svd",
            "configFiles": ["tools/Misc/pyocd.yaml"],
            "targetId": "py32f003x4",
            "runToEntryPoint": "main",
            "showDevDebugOutput": "raw"
        }
    ]
}
Using VS Code Debugging
- Build debug version:
make debug-blinky - Set breakpoints in your code
- Press F5 to start debugging
- Use debug controls: F10 (step over), F11 (step into)
For complete debugging guide, see VS Code Debugging.
For detailed VS Code configuration, see VS Code Configuration.
Performance Tips
- Use release builds for final deployment:
cargo build --release - Enable LTO for smaller binaries in
Cargo.toml - Profile memory usage with
cargo bloat - Optimize for size with
opt-level = \"s\"inCargo.toml
Your development environment is now ready for PY32F0xx embedded development!
Your First Program
This tutorial will guide you through creating and running your first PY32F0xx program using the HAL.
Goal
By the end of this tutorial, you’ll have:
- Created a simple LED blinking program
- Built and flashed it to your PY32F0xx device
- Understood the basic structure of a PY32F0xx Rust program
Prerequisites
- Development environment is set up
- Hardware is connected and working
- PY32F0xx device with at least one LED connection
Step 1: Understanding the Basic Structure
Every PY32F0xx Rust program follows this basic pattern:
#![no_main]     // We don't use Rust's standard main
#![no_std]      // No standard library (embedded environment)

use panic_halt as _;  // Panic handler for embedded

use py32f0xx_hal as hal;  // Import HAL
use crate::hal::{
    pac,           // Peripheral Access Crate
    prelude::*,    // Common traits and imports
    rcc::HSIFreq,  // Clock configuration
};

use cortex_m_rt::entry;  // Entry point macro

#[entry]  // This is our \"main\" function
fn main() -> ! {
    // Hardware setup code goes here

    loop {
        // Main program loop
    }
}
Step 2: Create Your First Program
Let’s create a simple LED blinky program. Create examples/my_first_program.rs:
#![no_main]
#![no_std]

use panic_halt as _;

use py32f0xx_hal as hal;

use crate::hal::{
    pac,
    prelude::*,
    rcc::HSIFreq,
    timer::delay::Delay,
};

use cortex_m_rt::entry;

#[entry]
fn main() -> ! {
    // Take ownership of device peripherals
    let mut p = pac::Peripherals::take().unwrap();
    let cp = cortex_m::Peripherals::take().unwrap();

    // Configure the system clock
    let rcc = p.RCC
        .configure()
        .hsi(HSIFreq::Freq24mhz)  // Use 24MHz internal oscillator
        .sysclk(24.MHz())         // Set system clock to 24MHz
        .freeze(&mut p.FLASH);    // Apply clock configuration

    // Initialize GPIO port B
    let gpiob = p.GPIOB.split();

    // Configure PB5 as push-pull output (LED pin)
    let mut led = gpiob.pb5.into_push_pull_output();

    // Create a delay timer using the system timer
    let mut delay = Delay::new(cp.SYST, &rcc.clocks);

    // Main loop - blink the LED
    loop {
        led.set_high();           // Turn LED on
        delay.delay_ms(500_u16);  // Wait 500ms
        led.set_low();            // Turn LED off
        delay.delay_ms(500_u16);  // Wait 500ms
    }
}
Step 3: Build Your Program
# Build your program
make build EXAMPLE=my_first_program MCU_TYPE=py32f003xx4

# If successful, you should see:
# Compiling my_first_program v0.1.0
# Finished release [optimized] target(s)
Step 4: Flash to Device
# Connect your PY32F0xx device via SWD
# Then flash the program
make flash EXAMPLE=my_first_program MCU_TYPE=py32f003xx4

# You should see PyOCD output:
# 0001735:INFO:board:Target type is py32f003xx4
# 0001736:INFO:flash_loader:Erasing chip...
# 0001750:INFO:flash_loader:Programming...
# 0001755:INFO:flash_loader:Programming completed
Step 5: Verify It Works
After successful flashing:
- LED should start blinking - On for 500ms, off for 500ms
- If using PB5 - Connect LED with 330Ω resistor to GND
- No errors in terminal - Clean flash output indicates success
Understanding the Code
Memory Management
#![allow(unused)]
#![no_main]  // No standard main function
#![no_std]   // No heap allocation, stack-based only

fn main() {
use panic_halt as _;  // Simple panic handler - halts on panic
}
Hardware Abstraction
#![allow(unused)]
fn main() {
let mut p = pac::Peripherals::take().unwrap();
// pac::Peripherals gives access to all hardware peripherals
// take() ensures only one instance exists (singleton pattern)
}
Clock Configuration
#![allow(unused)]
fn main() {
let rcc = p.RCC
    .configure()
    .hsi(HSIFreq::Freq24mhz)  // Internal 24MHz oscillator
    .sysclk(24.MHz())         // System clock frequency
    .freeze(&mut p.FLASH);    // Lock in configuration
}
Why 24MHz? This is a proven, stable configuration that works reliably across PY32F0xx devices.
GPIO Setup
#![allow(unused)]
fn main() {
let gpiob = p.GPIOB.split();
// split() converts raw peripheral to HAL-managed GPIO port

let mut led = gpiob.pb5.into_push_pull_output();
// Configure specific pin as output
// push_pull = can source and sink current
}
Timing
#![allow(unused)]
fn main() {
let mut delay = Delay::new(cp.SYST, &rcc.clocks);
// Uses ARM Cortex-M SysTick timer for delays
// Calibrated to the system clock frequency
}
Customizing Your Program
Change Blink Rate
#![allow(unused)]
fn main() {
// Faster blinking
led.set_high();
delay.delay_ms(100_u16);  // 100ms on
led.set_low();
delay.delay_ms(100_u16);  // 100ms off

// Slower blinking
led.set_high();
delay.delay_ms(1000_u16);  // 1 second on
led.set_low();
delay.delay_ms(1000_u16);  // 1 second off
}
Use Different LED Pin
#![allow(unused)]
fn main() {
// For PY32F003 DFN8 package - use PA2 instead
let gpioa = p.GPIOA.split();
let mut led = gpioa.pa2.into_push_pull_output();
}
Add Multiple LEDs
#![allow(unused)]
fn main() {
let mut led1 = gpiob.pb5.into_push_pull_output();
let mut led2 = gpioa.pa2.into_push_pull_output();

loop {
    led1.set_high();
    led2.set_low();
    delay.delay_ms(250_u16);

    led1.set_low();
    led2.set_high();
    delay.delay_ms(250_u16);
}
}
Common Issues and Solutions
LED Not Blinking
-
Check wiring:
PB5 → [330Ω resistor] → LED anode LED cathode → GND -
Verify pin assignment:
- PY32F003I DFN8: Use PB5 (pin 1)
- Check your device pinout
-
Check power supply:
- Should be stable 3.3V
- Measure with multimeter
Build Errors
"error: target ‘thumbv6m-none-eabi’ not found"
rustup target add thumbv6m-none-eabi
"feature ‘py32f003xx4’ not found"
# Use correct feature for your device:
make build EXAMPLE=my_first_program MCU_TYPE=py32f030xx4  # for PY32F030
Flash Errors
"No devices found"
# Check SWD connections
pyocd list  # Should show your programmer

# Verify wiring:
# SWDIO ↔ PA13
# SWDCK ↔ PA14
# GND ↔ GND
"Flash failed"
# Try different SWD frequency
pyocd flash --frequency 1000000 target/thumbv6m-none-eabi/release/examples/my_first_program

# Or try mass erase first
pyocd erase --chip --target py32f003xx4
Next Steps
Congratulations! You’ve successfully created, built, and flashed your first PY32F0xx program. Here’s what to explore next:
Learn More Peripherals
- Serial Communication - USART communication
- ADC Reading - Analog input measurement
- PWM Output - Generate PWM signals
- Timers - Precise timing control
Explore Examples
# Try the serial echo example
make flash EXAMPLE=serial_echo MCU_TYPE=py32f003xx4

# Or the ADC example
make flash EXAMPLE=serial_adc MCU_TYPE=py32f003xx4
Build Real Projects
- Temperature monitor with serial output
- PWM motor controller
- Data logger with external sensors
- Simple IoT device with serial interface
Advanced Topics
- DMA transfers for high-performance I/O
- Interrupts for responsive systems
- Low power modes for battery applications
- Custom bootloaders for field updates
Reference Links
You’re now ready to start building more complex PY32F0xx applications!
PY32F003 Device Guide
The PY32F003 is a low-cost ARM Cortex-M0+ microcontroller particularly well-suited for cost-sensitive applications. This guide covers device-specific features and configurations.
Device Overview
PY32F003 Family Variants
| Device | Flash | RAM | Package Options | Key Features |
|---|---|---|---|---|
| PY32F003x4 | 16KB | 2KB | DFN8, TSSOP20 | Basic peripherals |
| PY32F003x6 | 32KB | 4KB | TSSOP20, QFN32 | More memory |
| PY32F003x8 | 64KB | 8KB | TSSOP20, QFN32 | Maximum memory |
Key Specifications
- Core: ARM Cortex-M0+ @ up to 24MHz
- Voltage: 1.7V to 5.5V operation
- Temperature: -40°C to +85°C (industrial)
- Power: Very low power consumption
- Packages: DFN8, TSSOP20, QFN32
Peripheral Availability
PY32F003 Peripheral Map
| Peripheral | F003x4 | F003x6 | F003x8 | Notes |
|---|---|---|---|---|
| GPIO | 6-27 pins | 15-27 pins | 15-27 pins | Package dependent |
| USART | USART1,2 | USART1,2 | USART1,2 | 2 channels |
| SPI | SPI1 | SPI1 | SPI1 | 1 channel |
| I2C | I2C1 | I2C1 | I2C1 | 1 channel |
| ADC | 1x12-bit | 1x12-bit | 1x12-bit | Up to 8 channels |
| Timers | TIM1,3,14,16,17 | TIM1,3,14,16,17 | TIM1,3,14,16,17 | Advanced + basic |
| RTC | Yes | Yes | Yes | 32.768kHz |
| IWDG | Yes | Yes | Yes | Independent watchdog |
| WWDG | Yes | Yes | Yes | Window watchdog |
| CRC | Yes | Yes | Yes | Hardware CRC |
Package-Specific Information
DFN8 Package (PY32F003I)
Ultra-compact 2x3mm package - ideal for space-constrained designs.
            DFN8 Pinout (Top View):
               VCC  1 ┌─────┐ 8  PB5/LED
               PA0  2 │     │ 7  PA14-SWDCK/PB6
               PA1  3 │     │ 6  PA13-SWDIO/PA10
               PA2  4 └─────┘ 5  PB0/PF2-NRST
Available Pins:
- Power: VCC, VSS
- Programming: PA13 (SWDIO), PA14 (SWDCK), NRST
- GPIO: PA0, PA1, PA2, PB5
- USART2: PA0 (TX), PA1 (RX)
- ADC: PA2 (Channel 2)
Recommended Usage:
#![allow(unused)]
fn main() {
// Verified working configuration
let tx = gpioa.pa0.into_alternate_af9();  // USART2_TX
let rx = gpioa.pa1.into_alternate_af9();  // USART2_RX
let adc_pin = gpioa.pa2.into_analog();    // ADC input
let led = gpiob.pb5.into_push_pull_output(); // Debug LED
}
Additional Features:
- More GPIO pins available
- Separate analog power (VDDA/VSSA)
- More peripheral pin options
- Better power supply decoupling
Memory Layout
Flash Memory Organization
PY32F003 Flash Layout:
┌─────────────────┐ 0x0800FFFF (64KB variant)
│   User Flash    │
│   (Application) │
├─────────────────┤ 0x08007FFF (32KB variant)
│                 │
├─────────────────┤ 0x08003FFF (16KB variant)
│   System Flash  │ 0x08003000
│   (Bootloader)  │
└─────────────────┘ 0x08000000
RAM Memory Map
PY32F003 RAM Layout:
┌─────────────────┐ 0x20001FFF (8KB variant)
│      SRAM       │
│   (User Data)   │
├─────────────────┤ 0x20000FFF (4KB variant)
│                 │
├─────────────────┤ 0x200007FF (2KB variant)
│                 │
└─────────────────┘ 0x20000000
Clock Configuration
Clock Sources
Internal Clocks:
- HSI: 8MHz internal RC oscillator (can be scaled to 24MHz)
- LSI: ~40kHz low-speed internal oscillator
External Clocks (optional):
- HSE: 4-32MHz external crystal/oscillator
- LSE: 32.768kHz external crystal (for RTC)
Recommended Clock Setup
#![allow(unused)]
fn main() {
// Standard 24MHz configuration (proven stable)
let rcc = p.RCC
    .configure()
    .hsi(HSIFreq::Freq24mhz)  // Use internal 24MHz
    .sysclk(24.MHz())         // System clock = 24MHz
    .freeze(&mut p.FLASH);

// Alternative: Use external crystal
let rcc = p.RCC
    .configure()
    .hse(8.MHz())            // 8MHz external crystal
    .sysclk(24.MHz())        // PLL to 24MHz
    .freeze(&mut p.FLASH);
}
Power Management
Supply Requirements
- VDD/VCC: 1.7V to 5.5V (main supply)
- VDDA: Analog supply (same as VDD in most cases)
- VSS/VSSA: Ground (0V)
Power Consumption (Typical @ 3.3V)
| Mode | Current | Description |
|---|---|---|
| Run @ 24MHz | ~3mA | Full speed operation |
| Run @ 8MHz | ~1.5mA | Reduced speed |
| Sleep | ~0.8mA | CPU stopped, peripherals active |
| Stop | ~2µA | Most peripherals stopped |
| Standby | ~1µA | Minimal power, RTC active |
Low Power Programming
#![allow(unused)]
fn main() {
use py32f0xx_hal::pwr::{PowerMode, Pwr};

// Enter sleep mode
cortex_m::asm::wfi(); // Wait for interrupt

// Enter stop mode
let pwr = Pwr::new(p.PWR);
pwr.stop_mode();

// Configure wake-up sources
pwr.enable_wakeup_pin(WakeupPin::PA0);
}
Development Tips
DFN8-Specific Considerations
- Limited pins - Plan pin usage carefully
- Single-layer PCB friendly - Bottom pad can be difficult
- Hand soldering - Requires fine-pitch soldering skills
- Debug access - PA13 on bottom pad may need special connector
Pin Multiplexing Strategy
#![allow(unused)]
fn main() {
// Example: Maximize utility of limited DFN8 pins
// PA0: USART2_TX (communication)
// PA1: USART2_RX (communication)
// PA2: ADC input (sensing)
// PB5: GPIO output (LED/control)
// PA13: SWDIO (programming - bottom pad)
// PA14: SWDCK (programming)
}
PCB Design Recommendations
DFN8 Package:
- Thermal pad connection to ground plane recommended
- Decoupling: 100nF close to VCC pin
- Crystal placement: Keep HSE crystal close if used
- Debug connector: Consider test points for PA13/PA14
Power Supply:
- Linear regulator for 3.3V from 5V if needed
- Battery operation possible with low-power modes
- Brown-out detection available in software
Common Applications
Sensor Nodes
#![allow(unused)]
fn main() {
// Temperature sensor with serial output
let temp_sensor = adc.convert(&adc_pin);
serial.write_str(&format!("Temp: {}°C\r\n", temp_to_celsius(temp_sensor)));
}
Simple Controllers
#![allow(unused)]
fn main() {
// Button-controlled LED
if button.is_high() {
    led.set_high();
} else {
    led.set_low();
}
}
Data Loggers
#![allow(unused)]
fn main() {
// Log sensor data periodically
rtc.set_alarm(60); // Every minute
loop {
    cortex_m::asm::wfi(); // Sleep until alarm
    let data = read_sensors();
    log_data(data);
}
}
Debugging and Development
SWD Programming
- SWDIO: PA13 (bottom pad on DFN8)
- SWDCK: PA14
- NRST: Hardware reset (optional)
- VCC/GND: Power for programmer
Serial Debugging
#![allow(unused)]
fn main() {
// Use USART2 for debug output
let mut debug_serial = Serial::usart2(
    p.USART2,
    (tx, rx),
    115200.bps(),
    rcc.clocks
);

// Debug output
writeln!(debug_serial, "Debug: value = {}", value).ok();
}
Migration Notes
From Other STM32F0xx
- Pin compatibility: Check alternate functions
- Clock setup: May need adjustment
- Peripheral differences: Some features may be missing
Between PY32F003 Variants
- Pin count differences: DFN8 vs TSSOP20 vs QFN32
- Memory sizes: Check flash/RAM requirements
- Package-specific features: Some pins only on larger packages
Next Steps
- Try Quick Start Guide with PY32F003
- Explore Serial Examples for communication
- Learn GPIO Control for I/O operations
- Check Hardware Setup for wiring
Blinky LED Example
The classic "Hello World" of embedded programming - blinking an LED. This example demonstrates basic GPIO output control and timing.
What It Does
This example:
- Configures the system clock to 24MHz
- Sets up a GPIO pin as output (typically PB5)
- Blinks an LED on and off every 500ms
- Runs indefinitely
Hardware Requirements
PY32F003I DFN8 Package
- PB5 (Pin 1): LED output
- GND (Pin 2): Ground connection
- VCC (Pin 8): 3.3V power
LED Circuit
PB5 → [330Ω resistor] → LED Anode
LED Cathode → GND
Component Values:
- LED: Standard 3mm or 5mm LED (any color)
- Resistor: 330Ω (current limiting)
- Current: ~7mA @ 3.3V
Code Example
#![no_main]
#![no_std]

use panic_halt as _;
use py32f0xx_hal as hal;

use crate::hal::{
    pac,
    prelude::*,
    rcc::HSIFreq,
    timer::delay::Delay,
};

use cortex_m_rt::entry;

#[entry]
fn main() -> ! {
    // Get hardware peripherals
    let mut p = pac::Peripherals::take().unwrap();
    let cp = cortex_m::Peripherals::take().unwrap();

    // Configure 24MHz system clock
    let rcc = p.RCC
        .configure()
        .hsi(HSIFreq::Freq24mhz)
        .sysclk(24.MHz())
        .freeze(&mut p.FLASH);

    // Setup GPIO
    let gpiob = p.GPIOB.split();
    let mut led = gpiob.pb5.into_push_pull_output();

    // Create delay timer
    let mut delay = Delay::new(cp.SYST, &rcc.clocks);

    // Blink forever
    loop {
        led.set_high();
        delay.delay_ms(500_u16);
        led.set_low();
        delay.delay_ms(500_u16);
    }
}
Building and Running
Using Make
# Build the example
# Simple way
make blinky           # Build only
make flash-blinky     # Build and flash

# Traditional way
make build EXAMPLE=blinky MCU_TYPE=PY32F003x4
make flash EXAMPLE=blinky MCU_TYPE=PY32F003x4
Using Cargo
# Build for PY32F003
cargo build --release --example blinky --features py32f003xx4

# Flash with PyOCD
pyocd flash target/thumbv6m-none-eabi/release/examples/blinky --target py32f003xx4
Expected Behavior
After flashing successfully:
- LED should turn ON for 500ms
- LED should turn OFF for 500ms
- Pattern repeats indefinitely
- Total cycle time: 1 second
Code Walkthrough
System Initialization
#![allow(unused)]
fn main() {
let mut p = pac::Peripherals::take().unwrap();
let cp = cortex_m::Peripherals::take().unwrap();
}
pac::Peripheralsprovides access to all microcontroller peripheralscortex_m::Peripheralsprovides access to ARM Cortex-M core peripheralstake()ensures singleton access (only one instance)
Clock Configuration
#![allow(unused)]
fn main() {
let rcc = p.RCC
    .configure()
    .hsi(HSIFreq::Freq24mhz)  // Internal 24MHz oscillator
    .sysclk(24.MHz())         // System clock = 24MHz
    .freeze(&mut p.FLASH);    // Apply and lock configuration
}
Why 24MHz?
- Stable and reliable frequency
- Good balance between performance and power
- Well-tested configuration
- Compatible with common baud rates
GPIO Setup
#![allow(unused)]
fn main() {
let gpiob = p.GPIOB.split();
let mut led = gpiob.pb5.into_push_pull_output();
}
split()converts raw GPIO peripheral to HAL-managed pinsinto_push_pull_output()configures pin as:- Output direction (not input)
- Push-pull mode (can drive high and low)
- Default low (LED starts off)
Timing
#![allow(unused)]
fn main() {
let mut delay = Delay::new(cp.SYST, &rcc.clocks);
}
- Uses ARM SysTick timer for precise delays
- Automatically calibrated to system clock frequency
delay_ms()provides millisecond-accurate delays
Main Loop
#![allow(unused)]
fn main() {
loop {
    led.set_high();           // LED ON (3.3V output)
    delay.delay_ms(500_u16);  // Wait 500ms
    led.set_low();            // LED OFF (0V output)
    delay.delay_ms(500_u16);  // Wait 500ms
}
}
Customizations
Change Blink Pattern
Fast Blink:
#![allow(unused)]
fn main() {
led.set_high();
delay.delay_ms(100_u16);
led.set_low();
delay.delay_ms(100_u16);
}
Slow Blink:
#![allow(unused)]
fn main() {
led.set_high();
delay.delay_ms(2000_u16);  // 2 seconds
led.set_low();
delay.delay_ms(2000_u16);
}
Heartbeat Pattern:
#![allow(unused)]
fn main() {
// Quick double-blink, then pause
for _ in 0..2 {
    led.set_high();
    delay.delay_ms(100_u16);
    led.set_low();
    delay.delay_ms(100_u16);
}
delay.delay_ms(800_u16);  // Long pause
}
Different LED Pins
Use PA2 (DFN8 Pin 7):
#![allow(unused)]
fn main() {
let gpioa = p.GPIOA.split();
let mut led = gpioa.pa2.into_push_pull_output();
}
Multiple LEDs:
#![allow(unused)]
fn main() {
let mut led1 = gpiob.pb5.into_push_pull_output();
let mut led2 = gpioa.pa2.into_push_pull_output();

loop {
    // Alternating blink
    led1.set_high();
    led2.set_low();
    delay.delay_ms(250_u16);

    led1.set_low();
    led2.set_high();
    delay.delay_ms(250_u16);
}
}
Toggle Method
#![allow(unused)]
fn main() {
// More efficient toggling
loop {
    led.toggle();
    delay.delay_ms(500_u16);
}
}
Troubleshooting
LED Not Blinking
Check Hardware:
- LED polarity - Long leg (anode) to resistor, short leg (cathode) to GND
- Resistor value - Use 330Ω to 1kΩ
- Connections - Ensure solid connections
- Power supply - Verify 3.3V on VCC
Check Software:
- Correct pin - Verify PB5 for DFN8 package
- Successful flash - Look for "Programming completed" message
- Device running - Try different delay values
LED Always On/Off
Always On:
#![allow(unused)]
fn main() {
// Check if set_low() is being called
led.set_low();   // Should turn LED off
led.set_high();  // Should turn LED on
}
Always Off:
- Check LED polarity (try reversing)
- Verify power supply voltage
- Test with multimeter on PB5 pin
Build Errors
Missing target:
rustup target add thumbv6m-none-eabi
Wrong feature:
# Use correct device feature
cargo build --example blinky --features py32f030xx4  # For PY32F030
cargo build --example blinky --features py32f003xx4  # For PY32F003
Flash Errors
Device not found:
# Check SWD connections
pyocd list

# Should show your programmer
Programming failed:
# Try erasing first
pyocd erase --chip --target py32f003xx4
make flash EXAMPLE=blinky MCU_TYPE=py32f003xx4
Advanced Variations
PWM Breathing LED
#![allow(unused)]
fn main() {
use py32f0xx_hal::pwm::*;

// Setup PWM on timer
let pwm = p.TIM1.pwm(
    gpiob.pb5.into_alternate_af2(),
    1.kHz(),
    &rcc.clocks
);

let mut pwm_ch = pwm.split();

// Breathing effect
loop {
    // Fade in
    for duty in 0..100 {
        pwm_ch.set_duty_cycle_percent(duty);
        delay.delay_ms(10_u16);
    }

    // Fade out
    for duty in (0..100).rev() {
        pwm_ch.set_duty_cycle_percent(duty);
        delay.delay_ms(10_u16);
    }
}
}
Interrupt-Driven Blink
use py32f0xx_hal::timer::{Event, Timer};
use cortex_m::interrupt::Mutex;
use core::cell::RefCell;

// Global LED reference
static LED: Mutex<RefCell<Option<gpio::gpiob::PB5<gpio::Output<gpio::PushPull>>>>> =
    Mutex::new(RefCell::new(None));

#[entry]
fn main() -> ! {
    // Setup timer interrupt
    let mut timer = Timer::tim1(p.TIM1, 1.Hz(), &rcc.clocks);
    timer.listen(Event::TimeOut);

    // Store LED globally
    cortex_m::interrupt::free(|cs| {
        LED.borrow(cs).replace(Some(led));
    });

    // Enable timer interrupt
    unsafe { cortex_m::peripheral::NVIC::unmask(pac::Interrupt::TIM1_UP_TIM16) };

    loop {
        cortex_m::asm::wfi(); // Sleep until interrupt
    }
}

#[interrupt]
fn TIM1_UP_TIM16() {
    // Toggle LED in interrupt
    cortex_m::interrupt::free(|cs| {
        if let Some(ref mut led) = LED.borrow(cs).borrow_mut().as_mut() {
            led.toggle();
        }
    });
}
Related Examples
- Serial Echo - Add serial communication to LED control
- PWM Examples - Generate PWM signals for LED brightness control
- Timer Examples - Advanced timing and interrupts
Next Steps
Once you have blinky working:
- Try Your First Program to understand the code better
- Explore GPIO Documentation for advanced pin control
- Add Serial Communication for debugging output
- Learn PWM Control for variable brightness
The humble blinky example is the foundation for all embedded development - once you master GPIO control, you can interface with any digital device!
Serial Communication Examples
This section covers serial communication examples that have been tested and verified on PY32F0xx hardware.
Overview
The PY32F0xx HAL includes two comprehensive serial communication examples:
- Serial Echo - Basic USART communication
- Serial ADC - Advanced serial + ADC integration
Both examples are confirmed working on PY32F003I DFN8 package at 9600 bps.
Key Features
Verified Configuration
- USART2: PA0=TX(AF9), PA1=RX(AF9)
- Baud Rate: 9600 bps
- Clock: 24MHz HSI (reliable configuration)
- Debug LED: PB5 for visual feedback
Hardware Tested
- Device: PY32F003I DFN8 package
- Programmer: PyOCD with ST-Link compatible
- Serial: USB-to-Serial adapters (multiple tested)
Quick Start
Build and Flash
# Serial echo example
make flash EXAMPLE=serial_echo MCU_TYPE=py32f003xx4

# Serial ADC example
make flash EXAMPLE=serial_adc MCU_TYPE=py32f003xx4
Connect Serial Terminal
# Using screen
screen /dev/ttyACM0 9600

# Using minicom
minicom -D /dev/ttyACM0 -b 9600
Pin Configuration
PY32F003I DFN8 Package
            DFN8 Pinout (Top View):
               VCC  1 ┌─────┐ 8  PB5/LED
               PA0  2 │     │ 7  PA14-SWDCK/PB6
               PA1  3 │     │ 6  PA13-SWDIO/PA10
               PA2  4 └─────┘ 5  PB0/PF2-NRST
Connections
| Pin | Function | Connection |
|---|---|---|
| PA0 | USART2 TX (AF9) | Serial adapter RX |
| PA1 | USART2 RX (AF9) | Serial adapter TX |
| PA2 | ADC Channel 2 | Analog input (0-3.3V) |
| PB5 | GPIO Output | LED + 330Ω resistor |
| PA13 | SWDIO | SWD programmer |
| PA14 | SWDCK | SWD programmer |
Technical Implementation
Clock Configuration
Both examples use the same reliable clock setup:
#![allow(unused)]
fn main() {
let rcc = p.RCC
    .configure()
    .hsi(HSIFreq::Freq24mhz)  // 24MHz HSI
    .sysclk(24.MHz())         // System clock
    .freeze(&mut p.FLASH);
}
USART Setup
The key to success is using AF9 alternate function:
#![allow(unused)]
fn main() {
let tx = gpioa.pa0.into_alternate_af9(); // TX
let rx = gpioa.pa1.into_alternate_af9(); // RX

let serial = Serial::usart2(
    p.USART2,
    (tx, rx),
    9600.bps(),
    clocks,
);
}
Debug LED
Visual feedback with PB5:
#![allow(unused)]
fn main() {
let mut led = gpiob.pb5.into_push_pull_output();
led.set_high().ok(); // LED on for activity
}
Example Comparison
| Feature | Serial Echo | Serial ADC |
|---|---|---|
| Complexity | Basic | Advanced |
| USART | ✅ Echo functionality | ✅ Command interface |
| ADC | ❌ Not used | ✅ PA2 analog input |
| Commands | ❌ Simple echo | ✅ Interactive (r/s/q/h) |
| Streaming | ❌ No | ✅ Continuous ADC |
| Best for | Learning basics | Real applications |
Testing Tools
Python Test Script
You can quickly verify serial communication using a Python script, for example, test_serial.py:
import serial
import time

# Connect to device
ser = serial.Serial('/dev/ttyACM0', 9600, timeout=1)

# Test echo
ser.write(b'Hello PY32F0xx!\n')
response = ser.read(50)
print(f"Response: {response}")

# For ADC example
ser.write(b'h')  # Get help
ser.write(b'r')  # Read ADC
ser.write(b's')  # Start streaming
time.sleep(5)
ser.write(b'q')  # Stop streaming
Manual Testing
# Connect to device
screen /dev/ttyACM0 9600

# For serial_echo.rs:
# Type any characters, they should echo back

# For serial_adc.rs:
# Type 'h' for help
# Type 'r' to read ADC once
# Type 's' to start streaming
# Type 'q' to stop streaming
Troubleshooting
No Serial Output
-
Check connections:
- PA0 (TX) → Serial adapter RX
- PA1 (RX) → Serial adapter TX
- GND → GND
-
Verify settings:
- Baud rate: 9600
- Data bits: 8
- Parity: None
- Stop bits: 1
-
Test adapter:
- Try different USB-to-Serial adapter
- Check adapter drivers
LED Not Working
- Check PB5 connection
- Verify LED polarity
- Use appropriate current-limiting resistor (330Ω)
ADC Issues
- Input range: Ensure 0-3.3V on PA2
- Reference: ADC uses VDD as reference
- Test with known voltage (e.g., 1.5V battery)
Next Steps
Once you have serial communication working:
- Explore USART Peripheral documentation
- Learn ADC Configuration details
- Try Custom Applications using serial
- Check Troubleshooting for advanced issues
Related Documentation
Serial Echo Example
The serial_echo.rs example demonstrates basic USART2 serial communication on the PY32F0xx microcontroller. This is the simplest serial example and a great starting point for learning.
What It Does
This example:
- Configures USART2 on PA0 (TX) and PA1 (RX) at 9600 bps
- Sets up a debug LED on PB5 for visual feedback
- Echoes back any characters received over serial
- Provides a simple interactive serial interface
Hardware Requirements
PY32F003I DFN8 Package
- PA0: USART2 TX (AF9) → Connect to serial adapter RX
- PA1: USART2 RX (AF9) → Connect to serial adapter TX
- PB5: Debug LED → Connect LED + 330Ω resistor to GND
- GND: Ground → Connect to serial adapter GND
Code Walkthrough
Clock Configuration
The example uses the same reliable clock setup as the working blinky example:
#![allow(unused)]
fn main() {
let rcc = p.RCC
    .configure()
    .hsi(HSIFreq::Freq24mhz)  // Set HSI to 24MHz
    .sysclk(24.MHz())         // Set system clock to 24MHz
    .freeze(&mut p.FLASH);
}
GPIO Setup
Configure pins for USART2 with AF9 alternate function:
#![allow(unused)]
fn main() {
// Split GPIO ports
let gpioa = p.GPIOA.split();
let gpiob = p.GPIOB.split();

// Configure USART2 pins with AF9
let tx = gpioa.pa0.into_alternate_af9(); // PA0 as TX
let rx = gpioa.pa1.into_alternate_af9(); // PA1 as RX

// Debug LED
let mut debug_pin = gpiob.pb5.into_push_pull_output();
}
Serial Interface
Create the USART2 serial interface:
#![allow(unused)]
fn main() {
let mut serial = p.USART2.serial((tx, rx), 9_600.bps(), &rcc.clocks);

// Send startup message
serial.write_str("=== USART2 PA0/PA1 AF9 WORKING - 9600 bps ===\\r\\n").ok();
}
Main Echo Loop
The main loop continuously reads and echoes characters:
#![allow(unused)]
fn main() {
loop {
    // Try to read a character
    if let Ok(byte) = serial.read() {
        // Toggle debug LED on activity
        debug_pin.toggle();

        // Echo character back (with handling for special characters)
        match byte {
            b'\\r' => {
                serial.write(b'\\r').ok();
                serial.write(b'\\n').ok();
            },
            _ => {
                serial.write(byte).ok();
            }
        }
    }
}
}
Building and Flashing
Using Make
# Build the example
make build EXAMPLE=serial_echo MCU_TYPE=py32f003xx4

```bash
# Simple way
make flash-serial_echo

# Traditional way
make flash EXAMPLE=serial_echo MCU_TYPE=PY32F003x4
Using Cargo Directly
# Build for PY32F003
cargo build --release --example serial_echo --features py32f003xx4

# Flash with PyOCD
pyocd flash target/thumbv6m-none-eabi/release/examples/serial_echo --target py32f003xx4
Testing the Example
1. Connect Hardware
Wire your USB-to-Serial adapter:
- Adapter RX → PA0 (PY32F0xx TX)
- Adapter TX → PA1 (PY32F0xx RX)
- Adapter GND → PY32F0xx GND
2. Open Serial Terminal
# Using screen
screen /dev/ttyACM0 9600

# Using minicom
minicom -D /dev/ttyACM0 -b 9600

# Using PuTTY (Windows)
# Set COM port, 9600 baud, 8-N-1
3. Expected Output
Upon connecting, you should see:
=== USART2 PA0/PA1 AF9 WORKING - 9600 bps ===
PA0: TX (AF9) - Register configured
PA1: RX (AF9) - Register configured
PB5: Debug LED - Activity indicator
Ready to echo characters...
Type any character:
4. Test Functionality
- Type any character → Should echo back immediately
- PB5 LED → Should toggle with each character
- Enter key → Should produce proper line endings
Expected Behavior
| Input | Output | LED |
|---|---|---|
H | H | Toggle |
Hello | Hello | Toggle for each char |
| Enter | New line | Toggle |
| Any ASCII | Same character | Toggle |
Troubleshooting
No Serial Output
-
Check wiring:
PY32F0xx Adapter PA0 (TX) → RX PA1 (RX) ← TX GND → GND -
Verify serial settings: 9600-8-N-1
-
Test serial adapter with loopback (TX→RX)
LED Not Working
- Check PB5 connection
- Verify LED polarity (anode to PB5, cathode via resistor to GND)
- Use 330Ω current-limiting resistor
Characters Corrupted
- Check baud rate (must be 9600)
- Verify clock configuration (24MHz HSI)
- Test different serial adapter
No Response
- Verify device is flashed and running
- Check SWD connections for programming
- Try reset (cycle power or use NRST)
Code Customization
Change Baud Rate
#![allow(unused)]
fn main() {
// Change from 9600 to 115200
let mut serial = p.USART2.serial((tx, rx), 115_200.bps(), &rcc.clocks);
}
Add More Functionality
#![allow(unused)]
fn main() {
// Process specific commands
match byte {
    b'h' | b'H' => {
        serial.write_str("Help: Type any character to echo\\r\\n").ok();
    },
    b'\\r' => {
        serial.write_str("\\r\\n").ok();
    },
    _ => {
        serial.write(byte).ok();
    }
}
}
Use Different Pins
#![allow(unused)]
fn main() {
// Use different USART pins (check datasheet for AF mappings)
let tx = gpioa.pa9.into_alternate_af1();  // USART1 TX
let rx = gpioa.pa10.into_alternate_af1(); // USART1 RX
let mut serial = p.USART1.serial((tx, rx), 9_600.bps(), &rcc.clocks);
}
Next Steps
Once you have the echo example working:
- Try Serial ADC Example for more advanced functionality
- Learn about USART Peripheral details
- Explore GPIO Configuration for other pins
- Build custom applications using serial communication
Related Examples
- Serial ADC - Combines serial with ADC readings
- Blinky LED - Basic GPIO output example
- USART Configuration - Advanced USART setup
Serial ADC Example
USART2 Configuration
I2C Slave Communication
The i2c_slave_demo.rs example demonstrates I2C slave functionality on the PY32F0xx microcontroller with serial debug output. This example shows how to configure the microcontroller as an I2C slave device that can receive data from an I2C master.
Overview
This example configures:
- I2C Slave: Address 0x50, 100kHz communication
- GPIO Pins: PA10 (SDA), PB6 (SCL) with AF6 alternate function
- Serial Debug: USART2 on PA0 (TX), PA1 (RX) at 9600 bps
- Status LED: PB5 for visual feedback
Hardware Setup
Pin Configuration
- PA10: I2C SDA (Serial Data) - AF6, Open Drain + Pull-up
- PB6: I2C SCL (Serial Clock) - AF6, Open Drain + Pull-up
- PA0: USART2 TX (Debug output) - AF9
- PA1: USART2 RX (Debug input) - AF9
- PB5: Status LED (Push-pull output)
External Connections
Connect external I2C pull-up resistors (4.7kΩ recommended) between:
- SDA (PA10) and VCC
- SCL (PB6) and VCC
Code Structure
Initialization
#![allow(unused)]
fn main() {
// Configure I2C pins with AF6
let _sda = gpioa.pa10.into_alternate_af6();
let _scl = gpiob.pb6.into_alternate_af6();

// GPIO configuration: Open Drain + Pull-up
unsafe {
    let gpioa = &(*pac::GPIOA::ptr());
    let gpiob = &(*pac::GPIOB::ptr());

    // PA10 (SDA): Open Drain + Pull-up
    gpioa.otyper.modify(|_, w| w.ot10().set_bit());
    gpioa.pupdr.modify(|_, w| w.pupd10().pull_up());

    // PB6 (SCL): Open Drain + Pull-up
    gpiob.otyper.modify(|_, w| w.ot6().set_bit());
    gpiob.pupdr.modify(|_, w| w.pupd6().pull_up());
}
}
I2C Slave Configuration
#![allow(unused)]
fn main() {
// Configure I2C SLAVE - Address 0x50
let slave_addr = 0x50_u8;
unsafe {
    let i2c = &(*pac::I2C::ptr());

    i2c.cr1.modify(|_, w| w.pe().clear_bit());
    i2c.cr2.write(|w| w.freq().bits(24_u8));
    i2c.oar1.write(|w| w.add().bits(slave_addr));
    i2c.cr1.write(|w| w.ack().set_bit().pe().set_bit());
}
}
Main Loop - Event Handling
#![allow(unused)]
fn main() {
loop {
    unsafe {
        let i2c = &(*pac::I2C::ptr());
        let sr1 = i2c.sr1.read();

        // Address matched - start of transaction
        if sr1.addr().bit_is_set() {
            contact_count += 1;
            writeln!(serial, "=== I2C Transaction #{} ===\r", contact_count).unwrap();

            // Clear ADDR flag (required for ACK)
            let _sr2_clear = i2c.sr2.read();
            i2c.cr1.modify(|_, w| w.ack().set_bit());
        }

        // Data received
        if sr1.rxne().bit_is_set() {
            let data = i2c.dr.read().dr().bits();
            byte_count += 1;

            writeln!(serial, "Data #{}: 0x{:02X} ({})", byte_count, data, data).unwrap();

            // Show ASCII if printable
            if data >= 32 && data <= 126 {
                writeln!(serial, "ASCII: '{}'\r", data as char).unwrap();
            }
        }

        // End of transaction
        if sr1.stopf().bit_is_set() {
            writeln!(serial, "Transaction complete\r\n").unwrap();

            // Clear STOP flag
            i2c.cr1.modify(|r, w| w.bits(r.bits()));
            i2c.cr1.modify(|_, w| w.ack().set_bit());
        }
    }
}
}
Building and Running
Build the Example
make build EXAMPLE=i2c_slave_demo
Flash to Microcontroller
make flash EXAMPLE=i2c_slave_demo
Monitor Serial Output
make monitor
# or
picocom /dev/ttyACM0 -b 9600
Expected Output
When an I2C master communicates with the slave, you’ll see output like:
=== I2C SLAVE DEMO ===
Configuration: PA10=SDA, PB6=SCL
I2C SLAVE configured at address 0x50
Waiting for I2C communication...

=== I2C Transaction #1 ===
Data #1: 0x42 (66)
ASCII: 'B'
Transaction complete

=== I2C Transaction #2 ===
Data #2: 0x48 (72)
ASCII: 'H'
Data #3: 0x65 (101)
ASCII: 'e'
Data #4: 0x6C (108)
ASCII: 'l'
Data #5: 0x6C (108)
ASCII: 'l'
Data #6: 0x6F (111)
ASCII: 'o'
Transaction complete
Testing with ESP32-H2
You can test the I2C slave using an ESP32-H2 as master with MicroPython:
from machine import I2C, Pin

# Configure I2C master
i2c = I2C(0, scl=Pin(22), sda=Pin(12), freq=100000)

# Scan for devices
devices = i2c.scan()
print(f"I2C devices found: {[hex(d) for d in devices]}")

# Send data to slave at address 0x50
if 0x50 in devices:
    # Send single byte
    i2c.writeto(0x50, b'A')

    # Send multiple bytes
    i2c.writeto(0x50, b'Hello')

    # Send custom data
    data = bytearray([0x01, 0x02, 0x03, 0xFF])
    i2c.writeto(0x50, data)
Key Features
- Slave Address: Configurable (default 0x50)
- Data Reception: Handles single and multi-byte transactions
- Serial Debug: Detailed transaction logging with hex, decimal, and ASCII display
- Transaction Counting: Tracks number of I2C communications
- ACK Generation: Proper acknowledgment handling for reliable communication
- Status Indication: Visual feedback through LED
Troubleshooting
No I2C Communication
- Check pull-up resistors on SDA and SCL lines
- Verify correct pin connections (PA10=SDA, PB6=SCL)
- Ensure master and slave use same frequency (100kHz)
- Check slave address matches in master code (0x50)
Incomplete Data Reception
- Monitor ACK flag handling in main loop
- Verify STOP condition detection
- Check for proper flag clearing sequence
Serial Output Issues
- Confirm USART2 connections (PA0=TX, PA1=RX)
- Verify baud rate settings (9600 bps)
- Check terminal configuration
Related Examples
serial_echo.rs- Basic serial communicationblinky.rs- Basic GPIO controlpwm.rs- PWM signal generation
Technical Details
- MCU: PY32F003x4 series
- I2C Speed: 100kHz (Standard mode)
- Clock: 24MHz HSI
- Addressing: 7-bit addressing mode
- Communication: Receive-only slave implementation
ADC Examples
PWM Examples
Timer Examples
GPIO
USART/Serial Communication
The PY32F0xx family provides flexible USART (Universal Synchronous/Asynchronous Receiver/Transmitter) peripherals for serial communication.
Available USART Peripherals
| Device | USART1 | USART2 | Notes |
|---|---|---|---|
| PY32F002A | ✅ | ❌ | Single USART |
| PY32F002B | ✅ | ❌ | Single USART |
| PY32F003 | ✅ | ✅ | Dual USART |
| PY32F030 | ✅ | ✅ | Dual USART |
Pin Configurations
USART1 Pin Mappings
| Pin | AF | Function | Package Availability |
|---|---|---|---|
| PA1 | AF1 | USART1_RX | All packages |
| PA2 | AF1 | USART1_TX | All packages |
| PA9 | AF1 | USART1_TX | TSSOP20+ only |
| PA10 | AF1 | USART1_RX | TSSOP20+ only |
USART2 Pin Mappings
| Pin | AF | Function | Package Availability |
|---|---|---|---|
| PA0 | AF9 | USART2_TX | All packages |
| PA1 | AF9 | USART2_RX | All packages |
| PA2 | AF4 | USART2_TX | All packages (alternative) |
| PA14 | AF1 | USART2_TX | All packages (alternative) |
Basic USART Setup
Simple Configuration
#![allow(unused)]
fn main() {
use py32f0xx_hal::{
    pac,
    prelude::*,
    rcc::HSIFreq,
    serial::Serial,
};

// Get peripherals
let mut p = pac::Peripherals::take().unwrap();

// Configure clock
let rcc = p.RCC
    .configure()
    .hsi(HSIFreq::Freq24mhz)
    .sysclk(24.MHz())
    .freeze(&mut p.FLASH);

// Setup GPIO
let gpioa = p.GPIOA.split();

// Configure pins for USART2
let tx = gpioa.pa0.into_alternate_af9();
let rx = gpioa.pa1.into_alternate_af9();

// Create serial interface
let mut serial = Serial::usart2(
    p.USART2,
    (tx, rx),
    9600.bps(),
    rcc.clocks,
);
}
Advanced Configuration
#![allow(unused)]
fn main() {
use py32f0xx_hal::serial::{Config, Parity, StopBits};

// Custom serial configuration
let config = Config {
    baudrate: 115_200.bps(),
    parity: Parity::ParityNone,
    stopbits: StopBits::STOP1,
    // Additional config options...
};

let mut serial = Serial::usart1(
    p.USART1,
    (tx, rx),
    config,
    rcc.clocks,
);
}
Supported Baud Rates
The USART peripheral supports a wide range of baud rates, limited by the system clock:
Common Baud Rates (24MHz System Clock)
| Baud Rate | Typical Use Case | Error Rate |
|---|---|---|
| 2400 | Low-speed sensors | < 0.1% |
| 4800 | Legacy devices | < 0.1% |
| 9600 | General purpose | < 0.1% |
| 19200 | Faster communication | < 0.1% |
| 38400 | High-speed sensors | < 0.1% |
| 57600 | Fast data transfer | < 0.2% |
| 115200 | Maximum practical | < 0.5% |
Calculating Baud Rate
#![allow(unused)]
fn main() {
// Baud rate = Clock / (16 * USARTDIV)
// For 24MHz clock and 9600 baud:
// 9600 = 24,000,000 / (16 * USARTDIV)
// USARTDIV = 156.25 ≈ 156

let serial = Serial::usart2(
    p.USART2,
    (tx, rx),
    9600.bps(),  // HAL calculates USARTDIV automatically
    rcc.clocks,
);
}
Reading and Writing Data
Basic I/O Operations
#![allow(unused)]
fn main() {
use embedded_hal_02::serial::{Read, Write};

// Write single character
serial.write(b'A').ok();

// Write string
use core::fmt::Write;
serial.write_str(\"Hello World!\\r\\n\").ok();

// Read single character
if let Ok(byte) = serial.read() {
    // Process received byte
    println!(\"Received: {}\", byte as char);
}
}
Buffered Operations
#![allow(unused)]
fn main() {
// Write multiple bytes
let message = b\"Hello PY32F0xx!\";
for &byte in message {
    serial.write(byte).ok();
}

// Read with timeout handling
use cortex_m::interrupt;

let mut buffer = [0u8; 64];
let mut index = 0;

loop {
    match serial.read() {
        Ok(byte) => {
            buffer[index] = byte;
            index += 1;

            if byte == b'\\n' || index >= buffer.len() {
                // Process complete message
                break;
            }
        },
        Err(nb::Error::WouldBlock) => {
            // No data available, continue
        },
        Err(nb::Error::Other(_)) => {
            // Handle error
            break;
        }
    }
}
}
Interrupt-Driven Communication
#![allow(unused)]
fn main() {
use py32f0xx_hal::{
    pac::interrupt,
    serial::{Event, Serial},
};

// Enable RX interrupt
serial.listen(Event::Rxne);

// In interrupt handler
#[interrupt]
fn USART2() {
    // Handle received data
    if let Ok(byte) = SERIAL.read() {
        // Process byte
    }
}
}
Error Handling
Common Errors
#![allow(unused)]
fn main() {
use py32f0xx_hal::serial::Error;

match serial.read() {
    Ok(byte) => {
        // Process byte
    },
    Err(nb::Error::WouldBlock) => {
        // No data available
    },
    Err(nb::Error::Other(Error::Overrun)) => {
        // Data overrun - clear error
        serial.clear_overrun_error();
    },
    Err(nb::Error::Other(Error::Noise)) => {
        // Noise detected on line
    },
    Err(nb::Error::Other(Error::Framing)) => {
        // Framing error - incorrect stop bit
    },
    Err(nb::Error::Other(Error::Parity)) => {
        // Parity error
    },
}
}
Error Recovery
#![allow(unused)]
fn main() {
// Clear all errors
fn clear_serial_errors(serial: &mut Serial<USART2>) {
    // Read status register to clear flags
    let _ = serial.clear_overrun_error();
    let _ = serial.clear_noise_error();
    let _ = serial.clear_framing_error();
    let _ = serial.clear_parity_error();
}
}
DMA Integration
For high-throughput applications, USART can be used with DMA:
#![allow(unused)]
fn main() {
use py32f0xx_hal::dma::{dma1, Transfer, W, R};

// Setup DMA for TX
let tx_channel = dma1.ch2;
let tx_transfer = Transfer::init_memory_to_peripheral(
    tx_channel,
    serial.tx(),
    tx_buffer,
    None,
);

// Start DMA transfer
tx_transfer.start(|serial_tx| {
    serial_tx.enable_dma_tx();
});

// Setup DMA for RX
let rx_channel = dma1.ch3;
let rx_transfer = Transfer::init_peripheral_to_memory(
    rx_channel,
    serial.rx(),
    rx_buffer,
    None,
);
}
Flow Control
Software Flow Control (XON/XOFF)
#![allow(unused)]
fn main() {
const XON: u8 = 0x11;   // Resume transmission
const XOFF: u8 = 0x13;  // Pause transmission

// Send flow control characters
serial.write(XOFF).ok(); // Pause sender
serial.write(XON).ok();  // Resume sender

// Handle received flow control
match serial.read() {
    Ok(XON) => {
        // Resume sending
        tx_enabled = true;
    },
    Ok(XOFF) => {
        // Pause sending
        tx_enabled = false;
    },
    Ok(byte) => {
        // Normal data
    },
    _ => {}
}
}
Hardware Flow Control (RTS/CTS)
#![allow(unused)]
fn main() {
// Configure RTS/CTS pins (if available on package)
let rts = gpioa.pa12.into_alternate_af1(); // USART1_RTS
let cts = gpioa.pa11.into_alternate_af1(); // USART1_CTS

// Enable hardware flow control
let mut serial = Serial::usart1(
    p.USART1,
    (tx, rx),
    config.rts(rts).cts(cts),
    rcc.clocks,
);
}
Power Management
Low Power Operation
#![allow(unused)]
fn main() {
// Disable USART when not needed
serial.disable();

// Re-enable when needed
serial.enable();

// Use lower baud rates for better power efficiency
let serial = Serial::usart2(
    p.USART2,
    (tx, rx),
    2400.bps(),  // Lower baud = lower power
    rcc.clocks,
);
}
Wake-up from Stop Mode
#![allow(unused)]
fn main() {
// Configure USART for wake-up
serial.enable_wakeup();
serial.set_wakeup_method(WakeupMethod::StartBit);

// Enter stop mode
cortex_m::asm::wfi();

// USART activity will wake the MCU
}
Practical Examples
Command Interface
#![allow(unused)]
fn main() {
struct CommandProcessor {
    buffer: [u8; 64],
    index: usize,
}

impl CommandProcessor {
    fn process_byte(&mut self, byte: u8, serial: &mut Serial<USART2>) {
        match byte {
            b'\\r' | b'\\n' => {
                // Process complete command
                let command = &self.buffer[..self.index];
                self.handle_command(command, serial);
                self.index = 0;
            },
            b => {
                if self.index < self.buffer.len() {
                    self.buffer[self.index] = b;
                    self.index += 1;
                }
            }
        }
    }

    fn handle_command(&self, cmd: &[u8], serial: &mut Serial<USART2>) {
        match cmd {
            b\"help\" => {
                serial.write_str(\"Available commands:\\r\\n\").ok();
                serial.write_str(\"  help - Show this help\\r\\n\").ok();
                serial.write_str(\"  status - Show status\\r\\n\").ok();
            },
            b\"status\" => {
                serial.write_str(\"System OK\\r\\n\").ok();
            },
            _ => {
                serial.write_str(\"Unknown command\\r\\n\").ok();
            }
        }
    }
}
}
Data Logging
#![allow(unused)]
fn main() {
use heapless::Vec;

struct DataLogger {
    buffer: Vec<u8, 256>,
}

impl DataLogger {
    fn log_measurement(&mut self, value: f32, serial: &mut Serial<USART2>) {
        // Format measurement
        use core::fmt::Write;
        let mut formatted = heapless::String::<32>::new();
        write!(formatted, \"{:.2},{}\\r\\n\", value, timestamp()).ok();

        // Send over serial
        serial.write_str(&formatted).ok();

        // Store in buffer if needed
        self.buffer.extend_from_slice(formatted.as_bytes()).ok();
    }
}
}
Debugging Serial Issues
Signal Verification
#![allow(unused)]
fn main() {
// Toggle TX pin to verify GPIO configuration
let mut tx_pin = gpioa.pa0.into_push_pull_output();

loop {
    tx_pin.set_high();
    delay.delay_ms(500);
    tx_pin.set_low();
    delay.delay_ms(500);
}
}
Loopback Testing
#![allow(unused)]
fn main() {
// Connect TX to RX externally for loopback test
let test_data = b\"ABCDEF123456\";

for &byte in test_data {
    serial.write(byte).ok();

    // Should receive same byte back
    if let Ok(received) = serial.read() {
        if received != byte {
            // Loopback failed
            panic!(\"Loopback test failed\");
        }
    }
}
}
Best Practices
- Always use appropriate baud rates for your application
- Handle errors gracefully - serial lines can be noisy
- Use DMA for high-throughput applications
- Implement flow control for reliable communication
- Test with oscilloscope for timing verification
- Use proven pin configurations from working examples
- Add timeout handling to prevent hanging
- Clear errors promptly to maintain communication
Related Documentation
- Serial Examples - Working code examples
- Serial Echo Example - Basic implementation
- Serial ADC Example - Advanced usage
- GPIO Configuration - Pin setup details
- DMA Documentation - High-performance transfers
ADC
SPI
I2C
Timers
RTC
DMA
Multi-Protocol Programmer
Resources
| Resource | Link |
|---|---|
| Wiki | Development Boards Wiki |
| Documentation | unit_multiprotocol_programmer_platform |
| Getting Started | Initial Setup |
| Schematic & PCB | Hardware Files |
| Firmware & SDK | SDK & Firmware |
| Main Repository | GitHub Repo |
Firmware Required
This programmer requires specific firmware depending on the protocol:
- AVR: USBasp & UPDI
- ARM: CMSIS-DAP (SWD/JTAG)
- CPLD: USB-Blaster (JTAG)
Load the correct .bin before use. Without it, the device won’t function properly.
Overview
The Multi-Protocol Programmer is a USB tool based on the CH552 microcontroller. It supports flashing and debugging of:
- AVR microcontrollers (ATmega, ATtiny, AVR-DA)
- ARM Cortex-M devices (STM32, nRF52, SAM, etc.)
- Intel/Altera MAX II CPLDs (EPM240, EPM570, etc.)
Features
- USB Full-Speed (CDC/HID)
- Voltage selector: 3.3V / 5V
- SWD / JTAG / UPDI / USBasp support
- Works with popular tools (avrdude, OpenOCD, Quartus, etc.)
PY32F0xx Configuration
The Multi-Protocol Programmer is fully compatible with PY32F0xx microcontrollers when using the CMSIS-DAP firmware.
Testing Status & Recommendations
Tested Devices ✅
- PY32F003x4 - Fully verified with this programmer
- PY32F003x8 - Fully verified with this programmer
Recommended for Testing 🧪
For the following devices that are supported in code but need hardware verification:
- PY32F030 series (all variants)
- PY32F002A series
- PY32F002B series
This programmer is the recommended solution for testing these untested device variants.
Setup for PY32F0xx
-
Flash CMSIS-DAP Firmware:
python3 tools/chprog.py firmware/cmsis_dap.bin -
Connect to PY32F0xx:
Programmer PY32F0xx ---------- -------- SWDIO ←→ PA13 SWDCK ←→ PA14 GND ←→ GND VTG ←→ VCC (3.3V/5V) RST ←→ NRST (optional) -
Set Correct Voltage:
- Use 3.3V for most PY32F0xx devices
- Check your specific device voltage requirements
Using with PyOCD
The programmer works seamlessly with PyOCD for PY32F0xx development:
# List connected devices
pyocd list

# Flash PY32F003
pyocd flash firmware.bin --target py32f003xx4

# Start GDB server
pyocd gdbserver --target py32f003xx4

# Interactive debugging
pyocd commander --target py32f003xx4
Using with OpenOCD
OpenOCD can also be used with the CMSIS-DAP firmware:
# Flash firmware
openocd -f interface/cmsis-dap.cfg -f target/py32f0xx.cfg -c "program firmware.bin verify reset exit"

# Start GDB server
openocd -f interface/cmsis-dap.cfg -f target/py32f0xx.cfg
Makefile Integration
Update your project Makefile to use the Multi-Protocol Programmer:
# Use CMSIS-DAP interface
PROGRAMMER = cmsis-dap
PROGRAMMER_ARGS = --target py32f003xx4

flash: $(BUILD_DIR)/$(EXAMPLE).bin
	pyocd flash $(BUILD_DIR)/$(EXAMPLE).bin $(PROGRAMMER_ARGS)

debug: $(BUILD_DIR)/$(EXAMPLE).elf
	pyocd gdbserver $(PROGRAMMER_ARGS) &
	arm-none-eabi-gdb $(BUILD_DIR)/$(EXAMPLE).elf
Supported Protocols
| Firmware | Protocols | Target Devices | Interface | Tools |
|---|---|---|---|---|
| AVR | USBasp, UPDI | ATmega, ATtiny | CDC/HID | avrdude, Arduino IDE |
| CMSIS-DAP | SWD, JTAG | STM32, nRF52, PY32F0xx | HID+CDC | OpenOCD, PyOCD, Keil |
| CPLD | USB-Blaster | EPM240, EPM570, MAX II | HID | Quartus Prime |
Flashing Firmware
-
Enter Bootloader Mode:
- Hold
BOOT, plug USB, release.
- Hold
-
Flash Firmware:
python3 tools/chprog.py firmware/firmware_name.binOr use WCHISPTool on Windows.
Install Requirements
# Linux (Debian/Ubuntu)
sudo apt install build-essential sdcc python3-pip git
pip3 install pyusb pyocd

# Add user to dialout group for device access
sudo usermod -a -G dialout $USER
# Log out and back in for changes to take effect
For Windows: Download SDCC, Python 3, and Git.
Troubleshooting
Common Issues
-
Device not recognized? ➤ Check firmware & USB drivers (use Zadig on Windows for CMSIS-DAP)
-
Programming error? ➤ Verify voltage level (3.3V/5V), connections & cable quality
-
Slow upload? ➤ Reduce SWD/JTAG frequency or use shorter cables
PY32F0xx Specific
-
PyOCD can’t find device?
# Check if programmer is detected pyocd list # Try different target specification pyocd flash firmware.bin --target py32f030xx4 -
SWD connection issues?
- Verify SWDIO/SWDCK connections
- Ensure stable power supply
- Try lower SWD frequency:
--frequency 1000000
-
Flashing fails?
# Try mass erase first
pyocd erase --chip --target py32f003xx4

# Then flash
pyocd flash firmware.bin --target py32f003xx4
Testing Contributions
Help expand device support! If you test py32f0xx-hal with untested devices using this programmer:
-
Test procedure:
- Flash basic examples (
blinky,serial_echo) - Verify peripheral functionality
- Document any issues or successes
- Flash basic examples (
-
Report results:
- Open GitHub issue with test results
- Include device model, programmer setup, and example outcomes
- Help us update the compatibility matrix
Firmware Selection Guide
For PY32F0xx development, use the CMSIS-DAP firmware:
| Target Family | Recommended Firmware | Interface | Tools |
|---|---|---|---|
| PY32F0xx | CMSIS-DAP | SWD | PyOCD, OpenOCD |
| STM32F0xx | CMSIS-DAP | SWD | PyOCD, OpenOCD |
| AVR | USBasp/UPDI | ISP/UPDI | avrdude |
| MAX II CPLD | USB-Blaster | JTAG | Quartus |
Performance Notes
SWD Frequency Settings
For reliable PY32F0xx programming:
- High-speed:
--frequency 10000000(10MHz) - for short cables - Standard:
--frequency 1000000(1MHz) - recommended default - Low-speed:
--frequency 400000(400kHz) - for problematic connections
Cable Quality
- Use short cables (< 15cm) for high-speed SWD
- Twisted pair for SWDIO/SWDCK reduces noise
- Good ground connection essential for reliable operation
License
- Hardware: CC BY-SA 4.0
- Firmware & Software: MIT License
- Third-party components: see individual
LICENSEfiles
OpenOCD Support
While PyOCD is the recommended and default programming interface for PY32F0xx development, OpenOCD is also supported for users who prefer it or have specific workflow requirements.
Files Location
OpenOCD configuration files are located in the tools/openocd/ directory:
openocd.cfg- OpenOCD configuration file for PY32F0xx microcontrollersopenocd_program.sh- Shell script for programming with OpenOCDREADME.md- Documentation for OpenOCD setup
When to Use OpenOCD
Consider using OpenOCD if you:
- Have existing OpenOCD-based workflows
- Need specific OpenOCD features
- Are integrating with tools that expect OpenOCD
- Want to use OpenOCD-specific debugging features
Installation
Linux (Ubuntu/Debian)
sudo apt-get install openocd
macOS
brew install openocd
Windows
Download from the OpenOCD releases page.
Usage
Using the Configuration Files
-
Navigate to the OpenOCD directory:
cd tools/openocd/ -
Run OpenOCD with the provided configuration:
openocd -f openocd.cfg -
In another terminal, use GDB to load your program:
arm-none-eabi-gdb target/thumbv6m-none-eabi/release/examples/blinky
(gdb) target remote localhost:3333
(gdb) load
(gdb) continue
Using the Programming Script
The openocd_program.sh script provides a convenient way to program your device:
./tools/openocd/openocd_program.sh path/to/your/firmware.elf
Default PyOCD Workflow
For most users, we recommend sticking with the default PyOCD workflow:
# Install PyOCD (done automatically with make setup-venv)
pip install pyocd

# Use the simplified Makefile commands
make blinky           # Build example
make flash-blinky     # Build and flash
Troubleshooting
Connection Issues
If you’re having connection problems with OpenOCD:
- Check your debugger connection
- Verify the correct configuration file is being used
- Make sure no other debugging session is active
- Try resetting your development board
Permission Issues (Linux)
You may need to add udev rules for your debugger:
sudo usermod -a -G dialout $USER
sudo udevadm control --reload-rules
sudo udevadm trigger
Log out and log back in for changes to take effect.
Configuration Details
The provided openocd.cfg is configured specifically for PY32F0xx microcontrollers. If you need to modify it for your specific setup, refer to the OpenOCD documentation for:
- Interface configuration (ST-Link, J-Link, etc.)
- Target-specific settings
- Memory map customization
Switching Back to PyOCD
To switch back to the default PyOCD workflow:
make clean
make flash-blinky  # Uses PyOCD by default
The Makefile uses PyOCD by default, so no configuration changes are needed.
VS Code Configuration
This page details the VS Code configuration included in the project for optimal PY32F0xx development.
Required Extensions
Install these extensions for full functionality:
Core Development
code --install-extension rust-lang.rust-analyzer
code --install-extension ms-vscode.cpptools
Debugging
code --install-extension marus25.cortex-debug
Settings Configuration
The project includes .vscode/settings.json with optimized settings for embedded Rust development:
{
    "rust-analyzer.cargo.target": "thumbv6m-none-eabi",
    "rust-analyzer.checkOnSave.allTargets": false,
    "rust-analyzer.cargo.allFeatures": false,
    "rust-analyzer.cargo.features": ["py32f003xx4"],
    "rust-analyzer.check.allTargets": false,
    "files.associations": {
        "*.svd": "xml"
    },
    "cortex-debug.variableUseNaturalFormat": true,
    "cortex-debug.showRTOS": true
}
Settings Explanation
rust-analyzer.cargo.target: Sets the target architecture for analysischeckOnSave.allTargets: Disables checking all targets (improves performance)cargo.allFeatures: Disables all features analysis for better performancecargo.features: Specifies default MCU features (PY32F003x4)files.associations: Associates SVD files with XML syntax highlightingcortex-debug.*: Optimizes debugging display options
Launch Configuration
The debugging configuration is in .vscode/launch.json:
{
    "version": "0.2.0",
    "configurations": [
        {
            "name": "Debug PY32F0xx",
            "type": "cortex-debug",
            "request": "launch",
            "servertype": "pyocd",
            "cwd": "${workspaceRoot}",
            "executable": "target/thumbv6m-none-eabi/debug/examples/blinky",
            "device": "py32f003x4",
            "svdFile": "tools/Misc/SVD/py32f003xx.svd",
            "configFiles": ["tools/Misc/pyocd.yaml"],
            "targetId": "py32f003x4",
            "runToEntryPoint": "main",
            "showDevDebugOutput": "raw"
        }
    ]
}
Configuration Explanation
servertype: "pyocd": Uses PyOCD as debug serverdevice: "py32f003x4": Specifies target devicesvdFile: Points to SVD file for peripheral register viewconfigFiles: Uses project PyOCD configurationrunToEntryPoint: Stops at main functionshowDevDebugOutput: Shows detailed debug output
Different MCU Types
To use different MCU variants, update both files:
For PY32F003x6:
// .vscode/settings.json
"rust-analyzer.cargo.features": ["py32f003xx6"]

// .vscode/launch.json
"device": "py32f003x6"
For PY32F030x6:
// .vscode/settings.json
"rust-analyzer.cargo.features": ["py32f030xx6"]

// .vscode/launch.json
"device": "py32f030x6"
Multiple Debug Configurations
You can add multiple configurations for different examples:
{
    "version": "0.2.0",
    "configurations": [
        {
            "name": "Debug Blinky",
            "type": "cortex-debug",
            "executable": "target/thumbv6m-none-eabi/debug/examples/blinky",
            // ... other settings
        },
        {
            "name": "Debug Serial Echo",
            "type": "cortex-debug",
            "executable": "target/thumbv6m-none-eabi/debug/examples/serial_echo",
            // ... other settings
        }
    ]
}
Workspace Recommendations
The project includes .vscode/extensions.json with recommended extensions:
{
    "recommendations": [
        "rust-lang.rust-analyzer",
        "ms-vscode.cpptools",
        "marus25.cortex-debug"
    ]
}
Tasks Configuration
You can also add .vscode/tasks.json for build tasks:
{
    "version": "2.0.0",
    "tasks": [
        {
            "label": "Build Blinky",
            "type": "shell",
            "command": "make",
            "args": ["blinky"],
            "group": "build",
            "problemMatcher": "$rustc"
        },
        {
            "label": "Flash Blinky",
            "type": "shell",
            "command": "make",
            "args": ["flash-blinky"],
            "group": "build",
            "dependsOn": "Build Blinky"
        },
        {
            "label": "Debug Build Blinky",
            "type": "shell",
            "command": "make",
            "args": ["debug-blinky"],
            "group": "build"
        }
    ]
}
Troubleshooting
Rust Analyzer Issues
If Rust Analyzer is slow or not working:
- Restart Rust Analyzer:
Ctrl+Shift+P→ “rust-analyzer: Restart server” - Clear cache: Delete
target/directory and rebuild - Check target: Ensure
thumbv6m-none-eabiis installed
Debug Issues
If debugging doesn’t work:
- Check extensions: Ensure Cortex-Debug is installed
- Build debug: Run
make debug-blinkyfirst - Check hardware: Verify SWD connection
- PyOCD test: Run
make -f rust.mk debugto test connection
Performance Issues
If VS Code is slow:
- Disable unused extensions in workspace
- Use specific features: Don’t enable all MCU features
- Exclude build dirs: Add to
.gitignoreand VS Code exclude
Integration with Make Commands
The VS Code configuration works seamlessly with Make commands:
# Build for analysis
make blinky

# Build for debugging
make debug-blinky

# Flash and test
make flash-blinky
Advanced Configuration
Custom Keybindings
Add to your keybindings.json:
[
    {
        "key": "f6",
        "command": "workbench.action.tasks.runTask",
        "args": "Build Blinky"
    },
    {
        "key": "f7",
        "command": "workbench.action.tasks.runTask",
        "args": "Flash Blinky"
    }
]
Integrated Terminal
Set default shell for embedded development:
{
    "terminal.integrated.defaultProfile.linux": "bash",
    "terminal.integrated.cwd": "${workspaceFolder}"
}
This configuration provides a complete, optimized VS Code experience for PY32F0xx development!
VS Code Debugging Setup
This guide shows how to set up debugging for PY32F0xx development in VS Code using the Cortex-Debug extension.
Prerequisites
-
Cortex-Debug Extension - Install from VS Code marketplace:
code --install-extension marus25.cortex-debug -
PyOCD installed and configured - Should be done automatically by setup script:
./scripts/setup.sh
Launch Configuration
The project includes a pre-configured launch.json for debugging:
{
    "version": "0.2.0",
    "configurations": [
        {
            "name": "Debug PY32F0xx",
            "type": "cortex-debug",
            "request": "launch",
            "servertype": "pyocd",
            "cwd": "${workspaceRoot}",
            "executable": "target/thumbv6m-none-eabi/debug/examples/blinky",
            "device": "py32f003x4",
            "svdFile": "tools/Misc/SVD/py32f003xx.svd",
            "configFiles": [
                "tools/Misc/pyocd.yaml"
            ],
            "targetId": "py32f003x4",
            "runToEntryPoint": "main",
            "showDevDebugOutput": "raw"
        }
    ]
}
How to Debug
1. Build Debug Version
First, build your example in debug mode:
# Simple way - build debug version of blinky
make debug-blinky

# Build debug version of serial_echo
make debug-serial_echo

# Or for specific MCU (traditional way)
make debug-build EXAMPLE=blinky MCU_TYPE=PY32F003x4
2. Start Debugging
- Set Breakpoints - Click in the gutter next to line numbers
- Press F5 or go to Run > Start Debugging
- Select “Debug PY32F0xx” configuration
3. Debug Controls
- F5 - Continue
- F10 - Step Over
- F11 - Step Into
- Shift+F11 - Step Out
- Ctrl+Shift+F5 - Restart
- Shift+F5 - Stop
Debugging Different Examples
To debug different examples, update the executable path in launch.json:
"executable": "target/thumbv6m-none-eabi/debug/examples/YOUR_EXAMPLE"
Available examples:
blinkyserial_echoserial_adcadc_valuespwm- And more…
Multiple Configurations
You can add multiple debug configurations for different examples:
{
    "version": "0.2.0",
    "configurations": [
        {
            "name": "Debug Blinky",
            "type": "cortex-debug",
            "request": "launch",
            "servertype": "pyocd",
            "executable": "target/thumbv6m-none-eabi/debug/examples/blinky",
            "device": "py32f003x4",
            "svdFile": "tools/Misc/SVD/py32f003xx.svd",
            "configFiles": ["tools/Misc/pyocd.yaml"]
        },
        {
            "name": "Debug Serial Echo",
            "type": "cortex-debug",
            "request": "launch",
            "servertype": "pyocd",
            "executable": "target/thumbv6m-none-eabi/debug/examples/serial_echo",
            "device": "py32f003x4",
            "svdFile": "tools/Misc/SVD/py32f003xx.svd",
            "configFiles": ["tools/Misc/pyocd.yaml"]
        }
    ]
}
Different MCU Types
For different MCU variants, update the device field:
- PY32F003x4:
"device": "py32f003x4" - PY32F003x6:
"device": "py32f003x6" - PY32F003x8:
"device": "py32f003x8" - PY32F030x6:
"device": "py32f030x6" - PY32F030x8:
"device": "py32f030x8"
Troubleshooting
“Could not connect to target” Error
-
Check hardware connection:
- SWD pins connected correctly
- Device powered
- Debugger connected
-
Verify PyOCD can see device:
cd tools/Misc ../../venv/bin/pyocd list -
Check device matches configuration:
../../venv/bin/pyocd info --config pyocd.yaml
“Executable not found” Error
Make sure you’ve built the debug version:
# Build debug version of your example
make debug-blinky
make debug-serial_echo
make debug-pwm

# Or specific example
make debug-build EXAMPLE=your_example
Permission Issues (Linux)
Add user to dialout group:
sudo usermod -a -G dialout $USER
# Log out and back in
SVD File Issues
If peripheral registers don’t show properly, verify the SVD file path:
- File should be at:
tools/Misc/SVD/py32f003xx.svd - Check that the SVD file matches your MCU type
Debug Output
The configuration includes "showDevDebugOutput": "raw" which shows:
- PyOCD connection messages
- Memory read/write operations
- Reset and halt operations
This helps diagnose connection issues.
Advanced Features
Memory View
- View > Command Palette → Cortex-Debug: View Memory
- Enter memory address (e.g.,
0x20000000for RAM)
Peripheral Registers
- Available in Debug sidebar when debugging
- Shows all MCU peripherals with current values
- Requires correct SVD file
Disassembly View
- View > Command Palette → Cortex-Debug: View Disassembly
- Shows assembly code with source correlation
Tips
- Use debug build - Optimized builds are harder to debug
- Set meaningful breakpoints - Avoid breakpoints in tight loops
- Check variables - Hover over variables to see values
- Use watch expressions - Add variables to watch panel
- Single-step carefully - Some operations might affect timing-sensitive code
Serial Communication Troubleshooting
This guide helps you diagnose and fix common serial communication issues with PY32F0xx microcontrollers.
Quick Diagnostic Checklist
Before diving into detailed troubleshooting, check these common issues:
- Wiring: TX↔RX, RX↔TX, GND↔GND
- Baud Rate: 9600 bps on both sides
- Power: 3.3V to microcontroller
- Programming: Device successfully flashed
- Serial Adapter: Working and recognized by system
Common Problems and Solutions
1. No Serial Output at All
Symptoms
- No characters appear in serial terminal
- LED may or may not blink (depending on example)
- Terminal connects but shows no data
Diagnostic Steps
Check Hardware Connections
Verify wiring:
PY32F0xx     Serial Adapter
PA0 (TX)  →  RX
PA1 (RX)  ←  TX
GND       →  GND
Verify Serial Settings
- Baud rate: 9600
- Data bits: 8
- Parity: None
- Stop bits: 1
- Flow control: None
Test Serial Adapter
# Test adapter loopback (connect TX to RX on adapter)
echo \"test\" > /dev/ttyACM0
cat /dev/ttyACM0  # Should see \"test\"
Solutions
-
Fix Wiring Issues
- Double-check TX/RX connections (they cross over)
- Ensure good connections (no loose wires)
- Verify GND connection
-
Correct Pin Configuration
#![allow(unused)] fn main() { // Ensure you're using the right alternate function let tx = gpioa.pa0.into_alternate_af9(); // USART2 TX let rx = gpioa.pa1.into_alternate_af9(); // USART2 RX } -
Try Different Baud Rate
#![allow(unused)]
fn main() {
// Try lower baud rate
let mut serial = p.USART2.serial((tx, rx), 9_600.bps(), &rcc.clocks);
}
2. Garbled/Corrupted Characters
Symptoms
- Characters appear but are wrong/corrupted
- Random symbols instead of expected text
- Intermittent correct characters
Causes and Solutions
Baud Rate Mismatch
# Ensure both sides use same baud rate
# PY32F0xx side (in code):
let mut serial = p.USART2.serial((tx, rx), 9_600.bps(), &rcc.clocks);

# Terminal side:
screen /dev/ttyACM0 9600  # Must match!
Clock Configuration Issues
#![allow(unused)]
fn main() {
// Use proven 24MHz HSI configuration
let rcc = p.RCC
    .configure()
    .hsi(HSIFreq::Freq24mhz)
    .sysclk(24.MHz())
    .freeze(&mut p.FLASH);
}
Power Supply Problems
- Ensure stable 3.3V power supply
- Check for voltage drops under load
- Add decoupling capacitors (100nF)
3. Serial Works But Intermittently
Symptoms
- Sometimes works, sometimes doesn’t
- Works after reset but fails later
- Occasional correct characters
Solutions
-
Check Power Stability
# Measure supply voltage with multimeter # Should be stable 3.3V ± 0.1V -
Verify Clock Stability
#![allow(unused)] fn main() { // Use internal HSI (more stable than HSE) let rcc = p.RCC .configure() .hsi(HSIFreq::Freq24mhz) // Internal oscillator .sysclk(24.MHz()) .freeze(&mut p.FLASH); } -
Add Error Handling
#![allow(unused)]
fn main() {
// Handle serial errors gracefully
match serial.read() {
    Ok(byte) => {
        // Process byte
        serial.write(byte).ok();
    },
    Err(_) => {
        // Handle error - maybe reset USART
    }
}
}
4. Device Not Responding
Symptoms
- Serial terminal connects but no startup message
- No response to any input
- LED may still blink
Diagnostic Steps
-
Verify Programming
# Reflash the device make flash EXAMPLE=serial_echo MCU_TYPE=py32f003xx4 # Check flash was successful (no errors in output) -
Test with Different Example
# Flash and test blinky first make flash EXAMPLE=blinky MCU_TYPE=py32f003xx4 # LED should blink - confirms basic functionality -
Check Reset
# Try hardware reset
# Briefly pull NRST low or cycle power
Solutions
- Reflash Firmware
- Check SWD Programming Connections
- Verify Device is Running (check LED blinks)
5. Wrong USART Configuration
Common USART/Pin Combinations
For PY32F003I DFN8:
#![allow(unused)]
fn main() {
// Working configuration (tested):
// USART2 with AF9
let tx = gpioa.pa0.into_alternate_af9(); // Pin 3 → TX
let rx = gpioa.pa1.into_alternate_af9(); // Pin 6 → RX
let mut serial = p.USART2.serial((tx, rx), 9_600.bps(), &rcc.clocks);
}
Alternative USART1 configuration:
#![allow(unused)]
fn main() {
// USART1 with AF1 (different pins)
let tx = gpioa.pa9.into_alternate_af1();
let rx = gpioa.pa10.into_alternate_af1();
let mut serial = p.USART1.serial((tx, rx), 9_600.bps(), &rcc.clocks);
}
Advanced Diagnostics
Logic Analyzer Testing
If you have a logic analyzer:
-
Capture TX Line
- Set trigger on PA0 (TX)
- Look for correct 9600 baud timing
- Verify start bit, data bits, stop bit
-
Check Clock Signals
- Verify system clock is 24MHz
- Check USART clock enabling
Oscilloscope Testing
-
Measure TX Signal
- Should be 3.3V idle (high)
- Should go to 0V for start bits
- Timing: ~104µs per bit at 9600 baud
-
Check Power Rails
- Stable 3.3V on VDD
- No significant ripple or noise
Testing Tools and Scripts
Python Test Script
#!/usr/bin/env python3
import serial
import time
import sys

def test_serial(port='/dev/ttyACM0', baud=9600):
    try:
        ser = serial.Serial(port, baud, timeout=1)
        print(f\"Connected to {port} at {baud} baud\")

        # Test echo
        test_msg = \"Hello PY32F0xx!\"
        ser.write(test_msg.encode())
        time.sleep(0.1)

        response = ser.read(len(test_msg))
        print(f\"Sent: '{test_msg}'\")
        print(f\"Received: '{response.decode()}'\")

        if response.decode() == test_msg:
            print(\"✅ Echo test PASSED\")
        else:
            print(\"❌ Echo test FAILED\")

        ser.close()

    except Exception as e:
        print(f\"Error: {e}\")

if __name__ == \"__main__\":
    port = sys.argv[1] if len(sys.argv) > 1 else '/dev/ttyACM0'
    test_serial(port)
Manual Terminal Testing
# Test with different terminals
screen /dev/ttyACM0 9600
# or
minicom -D /dev/ttyACM0 -b 9600
# or
picocom -b 9600 /dev/ttyACM0
Device-Specific Issues
PY32F003I DFN8
Pin Limitations:
- Only 8 pins available
- PA0/PA1 are best choice for USART2
- PB5 available for debug LED
Known Working Configuration:
#![allow(unused)]
fn main() {
// Verified working on real hardware
let tx = gpioa.pa0.into_alternate_af9();
let rx = gpioa.pa1.into_alternate_af9();
let mut serial = p.USART2.serial((tx, rx), 9_600.bps(), &rcc.clocks);
}
PY32F030 TSSOP20
More Pin Options:
- Multiple USART pin combinations available
- Can use USART1 or USART2
- More GPIO pins for debugging
Getting Help
If none of these solutions work:
- Check Examples Documentation for working code
- Review Hardware Setup guide
- Compare with Working Configuration
- Open GitHub Issue with:
- Hardware details (device, package, programmer)
- Code that’s not working
- Error messages
- What you’ve already tried
Prevention Tips
To avoid serial communication issues:
- Start with working examples before modifying
- Use proven clock configurations (24MHz HSI)
- Verify hardware before coding (power, connections)
- Test serial adapter separately before connecting MCU
- Use consistent naming for TX/RX pins to avoid confusion
- Add error handling in production code
- Document your pin choices for future reference
GPIO Configuration
Debug LED Issues
Build Issues
Verification Guide
Pin Mapping
Memory Map
Clock Tree
Peripheral Support Matrix
How to Contribute
We welcome contributions to the PY32F0xx HAL project! Whether you’re fixing bugs, adding features, improving documentation, or testing on new hardware, your help is appreciated.
Ways to Contribute
Code Contributions
- Bug fixes - Fix issues you encounter
- New features - Add support for new peripherals or devices
- Examples - Create examples for common use cases
- Optimizations - Improve performance or reduce code size
Documentation
- Fix typos - Correct spelling and grammar errors
- Add examples - Document working code patterns
- Improve clarity - Make instructions easier to follow
- Translate content - Help with internationalization
Testing and Validation
- Test on new hardware - Verify HAL works on different devices
- Report bugs - Document issues you encounter
- Validate examples - Confirm examples work as expected
- Performance testing - Benchmark and optimize code
Getting Started
1. Set Up Development Environment
Follow our Development Environment Guide to set up your tools.
2. Fork and Clone
# Fork the repository on GitHub
# Then clone your fork
git clone https://github.com/YOUR_USERNAME/py32f0xx-hal.git
cd py32f0xx-hal

# Add upstream remote
git remote add upstream https://github.com/UNIT-Electronics-MX/py32f0xx-hal.git
3. Create a Feature Branch
# Create and switch to a new branch
git checkout -b feature/your-feature-name

# Or for bug fixes
git checkout -b fix/issue-description
Development Guidelines
Code Style
- Follow Rust conventions - Use
cargo fmtandcargo clippy - Document public APIs - Add doc comments to public functions
- Include examples - Show how to use new features
- Test thoroughly - Verify code works on real hardware
Commit Messages
Use clear, descriptive commit messages:
type: brief description

Optional longer description explaining the change.

Fixes #123
Types:
feat:- New featuresfix:- Bug fixesdocs:- Documentation changesstyle:- Code formattingrefactor:- Code restructuringtest:- Test additions or changeschore:- Maintenance tasks
Testing
- Test on real hardware - Ensure changes work on actual devices
- Include test cases - Add tests for new functionality
- Verify examples - Make sure all examples still compile and work
- Check documentation - Verify docs are accurate and complete
Submitting Changes
1. Prepare Your Changes
# Format code
cargo fmt

# Run clippy for linting
cargo clippy --all-targets --all-features

# Build all examples
make build-all

# Test documentation
cd docs && mdbook test
2. Commit and Push
# Stage changes
git add .

# Commit with descriptive message
git commit -m \"feat: add USART interrupt support\"

# Push to your fork
git push origin feature/your-feature-name
3. Create Pull Request
- Go to GitHub and create a pull request
- Describe your changes clearly in the PR description
- Reference issues if your PR fixes them
- Include testing details - what hardware you tested on
Pull Request Template
## Description
Brief description of what this PR does.

## Changes
- List of changes made
- New features added
- Bugs fixed

## Testing
- [ ] Tested on PY32F003I DFN8
- [ ] Tested on PY32F030 TSSOP20
- [ ] All examples compile
- [ ] Documentation updated

## Related Issues
Fixes #123
Areas Needing Help
High Priority
- Device support expansion - Test on more PY32F0xx variants
- Peripheral implementations - Complete I2C, SPI, DMA drivers
- Example collection - More real-world examples
- Documentation improvements - Clearer getting-started guides
Medium Priority
- Performance optimizations - Reduce code size and improve speed
- Power management - Low-power mode support
- Bootloader support - Custom bootloader implementations
- Testing framework - Automated hardware-in-loop testing
Good First Issues
- Fix documentation typos - Easy way to get started
- Add code comments - Improve code readability
- Create simple examples - Basic peripheral usage
- Update README files - Keep information current
Development Best Practices
Hardware Testing
When testing changes:
- Test on multiple devices if possible
- Use different packages (DFN8, TSSOP20, etc.)
- Verify with oscilloscope for timing-critical changes
- Document test setup in PR description
Code Review Process
- Self-review first - Check your own code carefully
- Address feedback promptly - Respond to review comments
- Update tests - Modify tests if needed
- Squash commits - Clean up commit history if requested
Documentation Standards
- Include working examples for new features
- Update CHANGELOG.md for significant changes
- Add troubleshooting info for complex features
- Keep style consistent with existing docs
Community Guidelines
Be Respectful
- Welcome newcomers - Everyone was a beginner once
- Give constructive feedback - Focus on the code, not the person
- Be patient - Not everyone has the same experience level
Be Collaborative
- Share knowledge - Help others learn
- Ask questions - Don’t hesitate to seek clarification
- Offer help - Assist with testing, documentation, or code review
Getting Help
Need help with contributing?
Communication Channels
- GitHub Issues - For bugs and feature requests
- GitHub Discussions - For questions and general discussion
- PR Comments - For code-specific questions
Resources
- Rust Embedded Book - Learn embedded Rust
- PY32F0xx Documentation - Hardware reference
- HAL Examples - Working code samples
Recognition
Contributors are recognized in:
- CHANGELOG.md - Credits for significant changes
- README.md - Hall of fame for major contributors
- GitHub Contributors - Automatic recognition
Legal
By contributing, you agree that your contributions will be licensed under the same license as the project (MIT/Apache 2.0).
Thank you for contributing to PY32F0xx HAL! Every contribution, no matter how small, helps make embedded Rust development better for everyone.
Development Guidelines
Testing
Changelog
All notable changes to the PY32F0xx HAL project are documented in this file.
The format is based on Keep a Changelog, and this project adheres to Semantic Versioning.
[Unreleased]
Added
- Complete mdBook documentation system
- Comprehensive serial communication examples
- English translation of all documentation
- Enhanced README with working examples
- Detailed troubleshooting guides
- Device-specific configuration guides
Changed
- Improved project structure and organization
- Enhanced example code with better comments
- Standardized clock configuration across examples
Fixed
- USART2 configuration for DFN8 package
- Serial communication reliability issues
- Documentation inconsistencies
[0.4.0] - Previous Release
Added
- Initial serial communication support
- Basic peripheral drivers (GPIO, USART, ADC, SPI, Timers)
- Support for PY32F002A, PY32F002B, PY32F003, PY32F030 families
- Examples for common use cases
- DMA support for F030/F003 series
Changed
- Updated to embedded-hal 1.0
- Improved error handling
- Enhanced GPIO pin configuration
Fixed
- Clock configuration issues
- Peripheral initialization problems
[0.3.0] - Earlier Release
Added
- Multi-device support
- Enhanced GPIO functionality
- Timer and PWM support
- RTC peripheral driver
Changed
- Refactored peripheral access patterns
- Improved documentation
Fixed
- Various peripheral configuration issues
[0.2.0] - Early Release
Added
- Basic HAL structure
- GPIO support
- Initial documentation
Changed
- Project organization
Fixed
- Initial bug fixes
[0.1.0] - Initial Release
Added
- Initial PY32F0xx HAL implementation
- Basic peripheral support
- Project foundation