DevLab: PWM AO4410 2-Channel Output Module
Introduction
The DevLab PWM AO4410 2-Channel Output Module is a compact, two-channel PCB designed to amplify pulse-width modulation signals from a microcontroller. It enables reliable switching of external loads at higher voltages and currents than the microcontroller can natively handle. With its clearly labeled screw-terminal connectors, the module is well-suited for motor speed control, high-power LED dimming, and other projects requiring precise power regulation via PWM. The board also includes a QWIIC-compatible 4-pin header, allowing for easy plug-and-play wiring and daisy-chaining of power and PWM signals using standard Qwiic cables.
Overview
| Feature | Details |
|---|---|
| 2-channel PWM | Two independent channels for versatile control |
| 5V logic | Compatible with 3.3V and 5V microcontrollers |
| 5V power supply | Powers external devices up to 2A |
| Qwiic connector | 4-pin connector for easy integration |
Use Cases
- Motor speed and direction control for DC motors
- Brightness control for high-power LEDs
- Temperature control for heating elements
- Efficient power regulation for various loads
- Amplifying PWM signals for long-distance transmission
Resources
License
All hardware and documentation in this project are licensed under the MIT License.
Please refer to LICENSE.md for full terms.
Hardware Overview
Key Technical Specifications
- Input Voltage: -
- Output Current: -
- PWM Frequency: -
- Control Interface: JST 1mm Connector
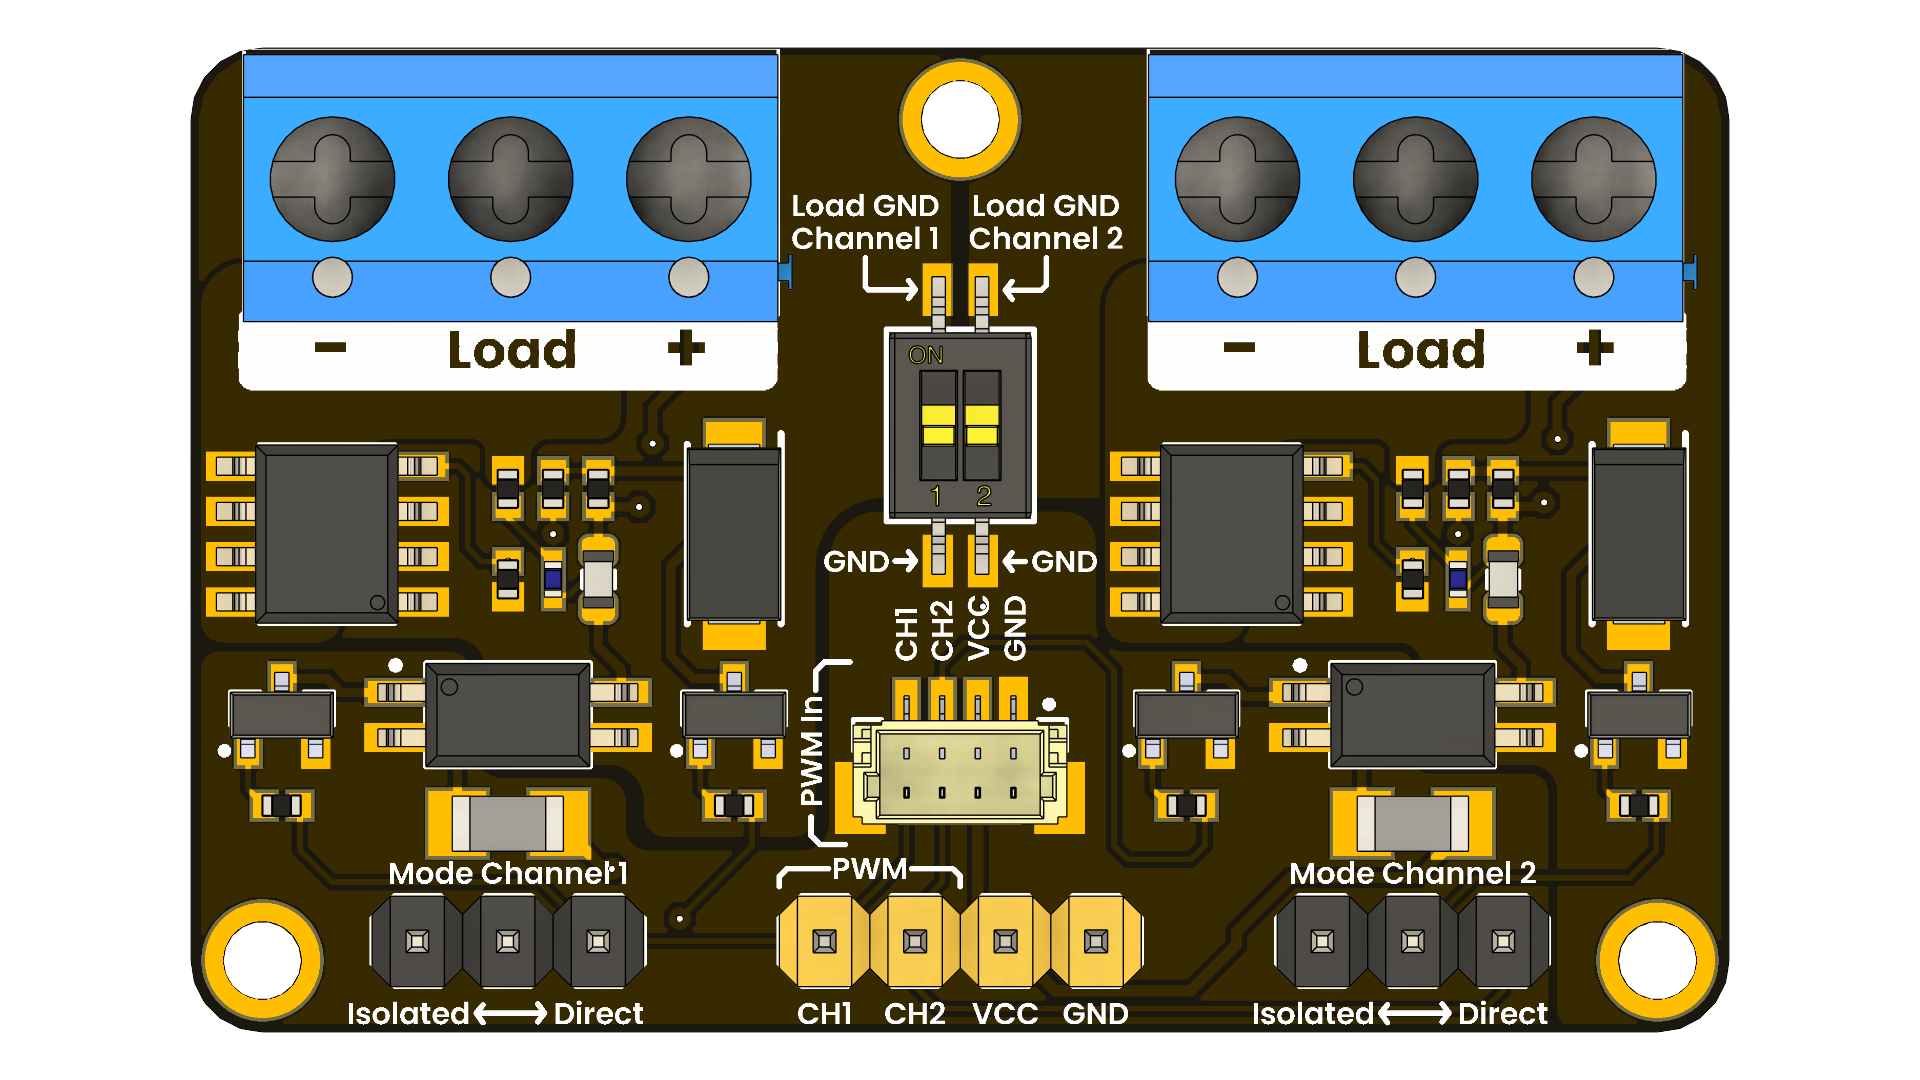
Pinout

| Channel | Description | Control Pins | Power Pins | Load Terminals | Typical Use |
|---|---|---|---|---|---|
| PWM Channel 1 | MOSFET-based driver that amplifies MCU’s PWM output to switch a heavier external load | PWM1, GND | VCC1, GND | Load1 | DC motors, high-power LEDs, solenoids |
| PWM Channel 2 | Identical high-current PWM driver on a second channel | PWM2, GND | VCC2, GND | Load2 | Same as Channel 1 |
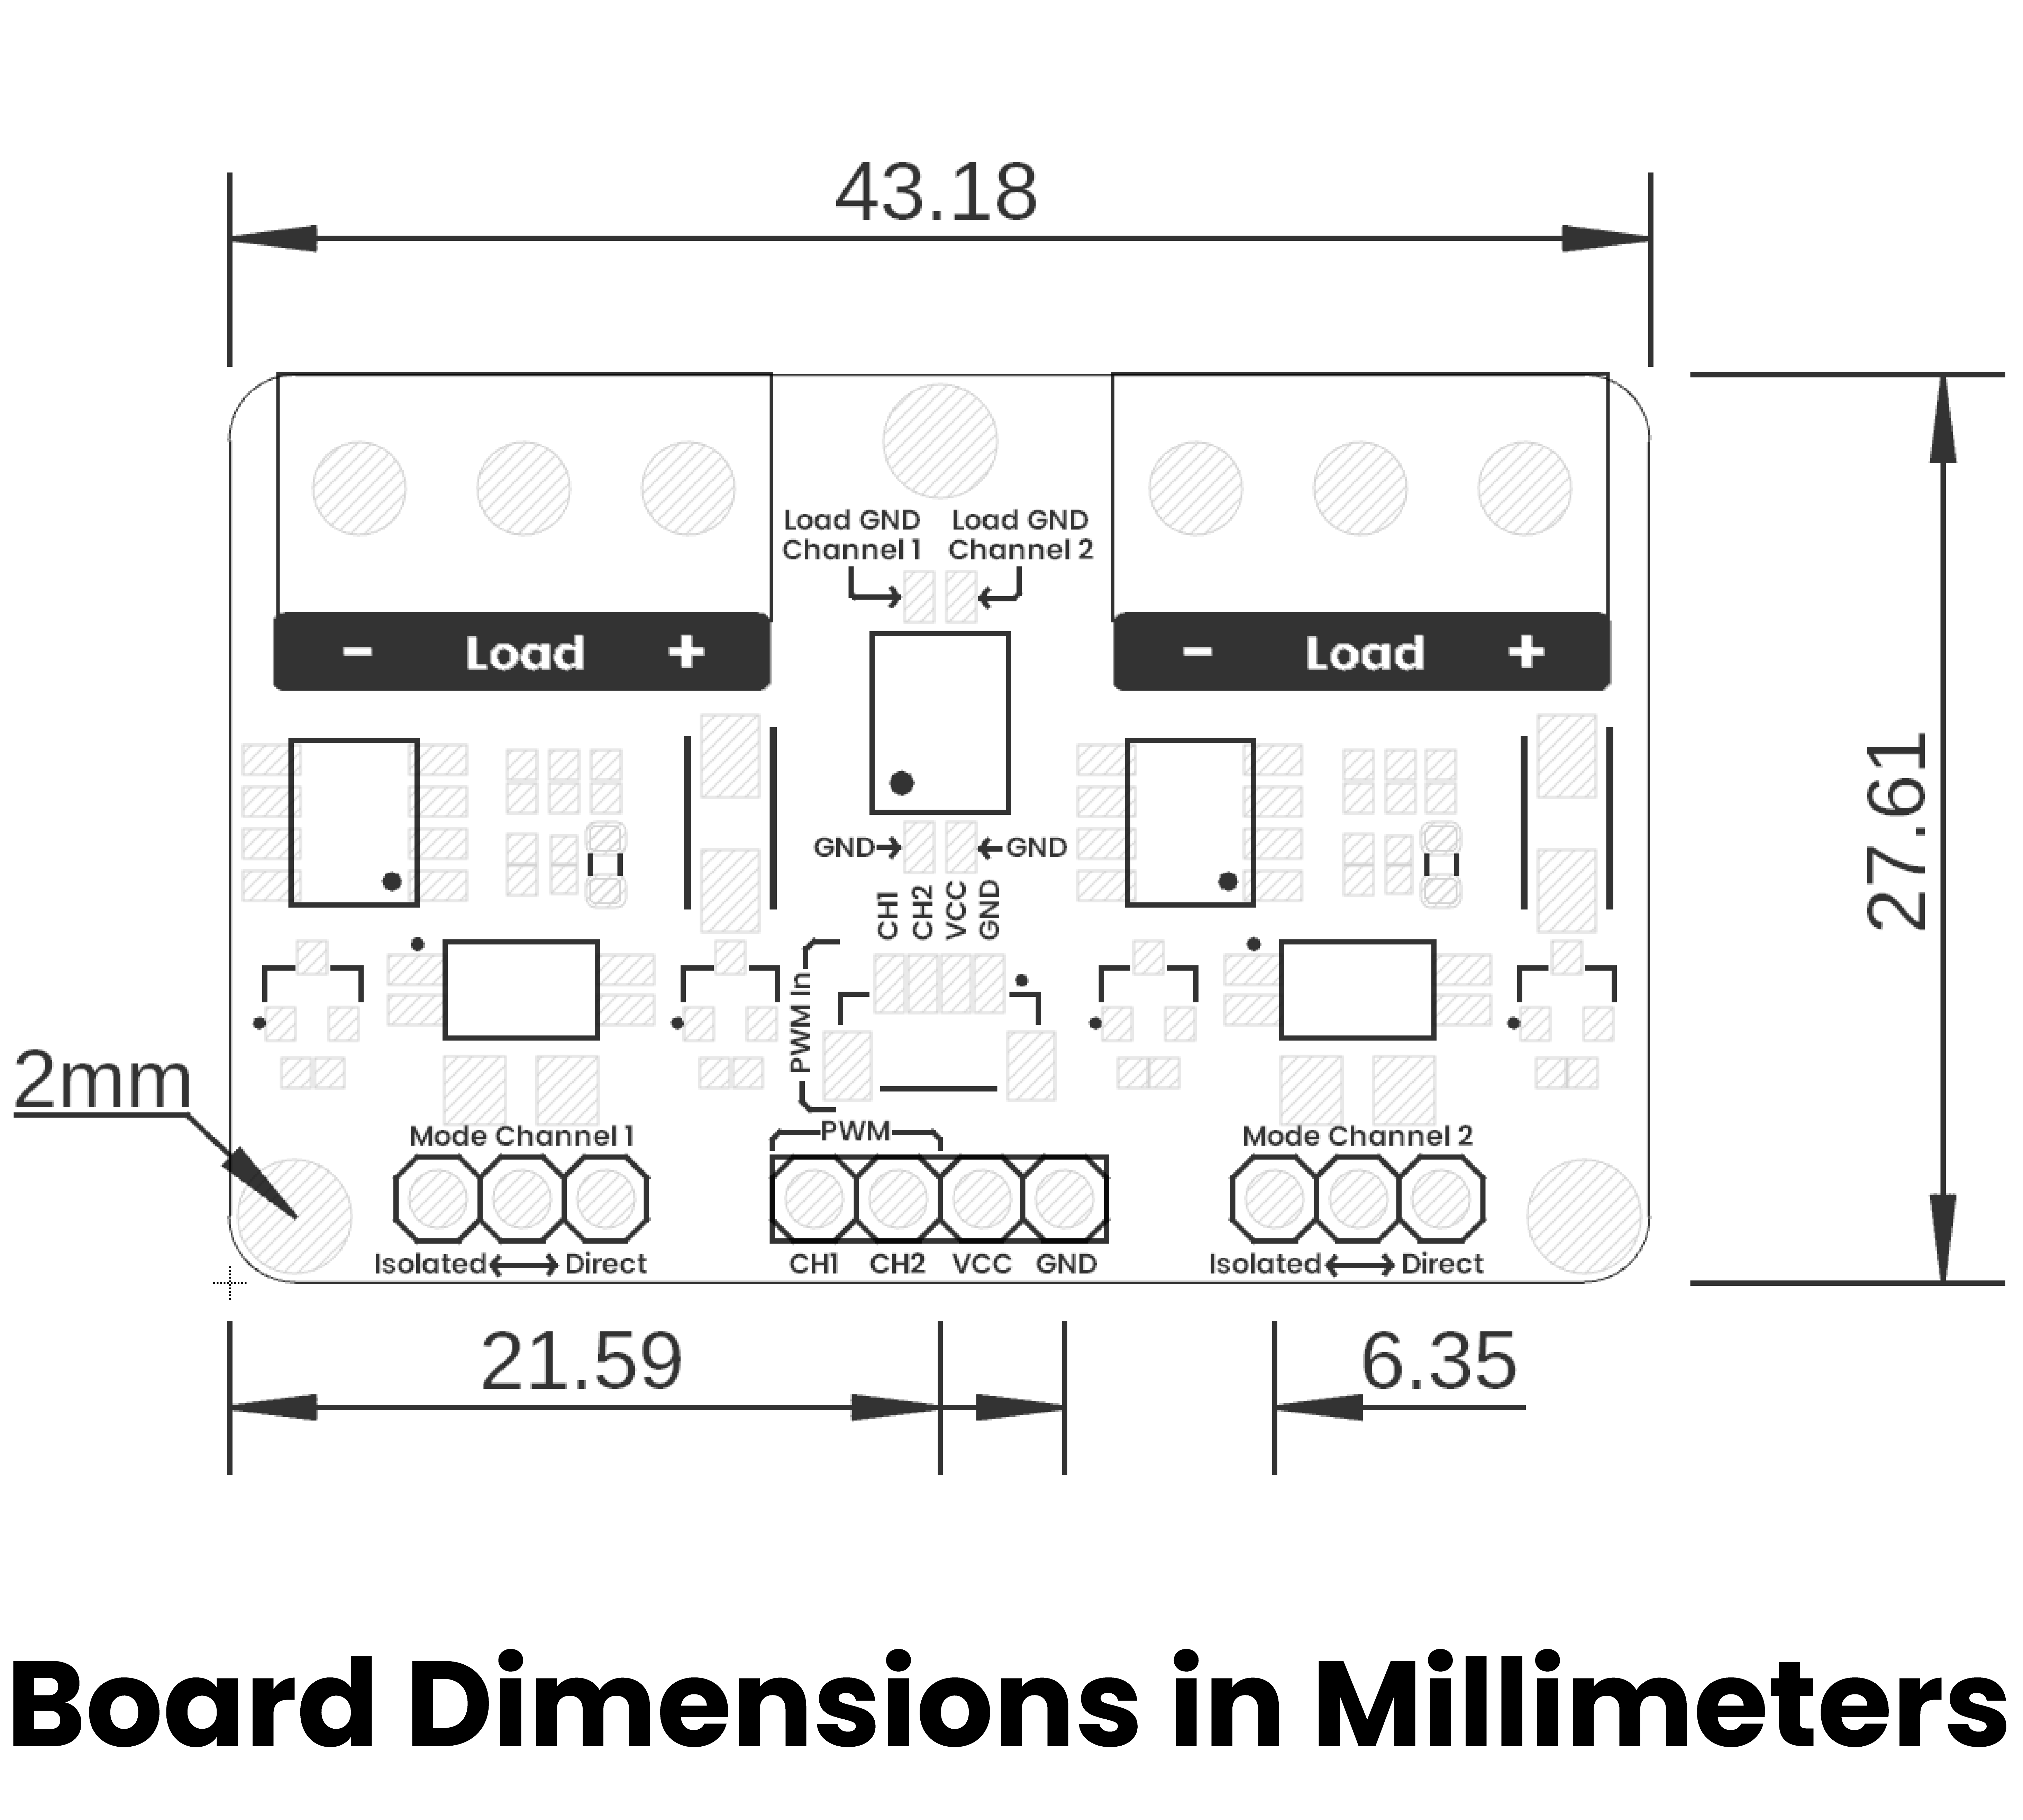
Dimensions
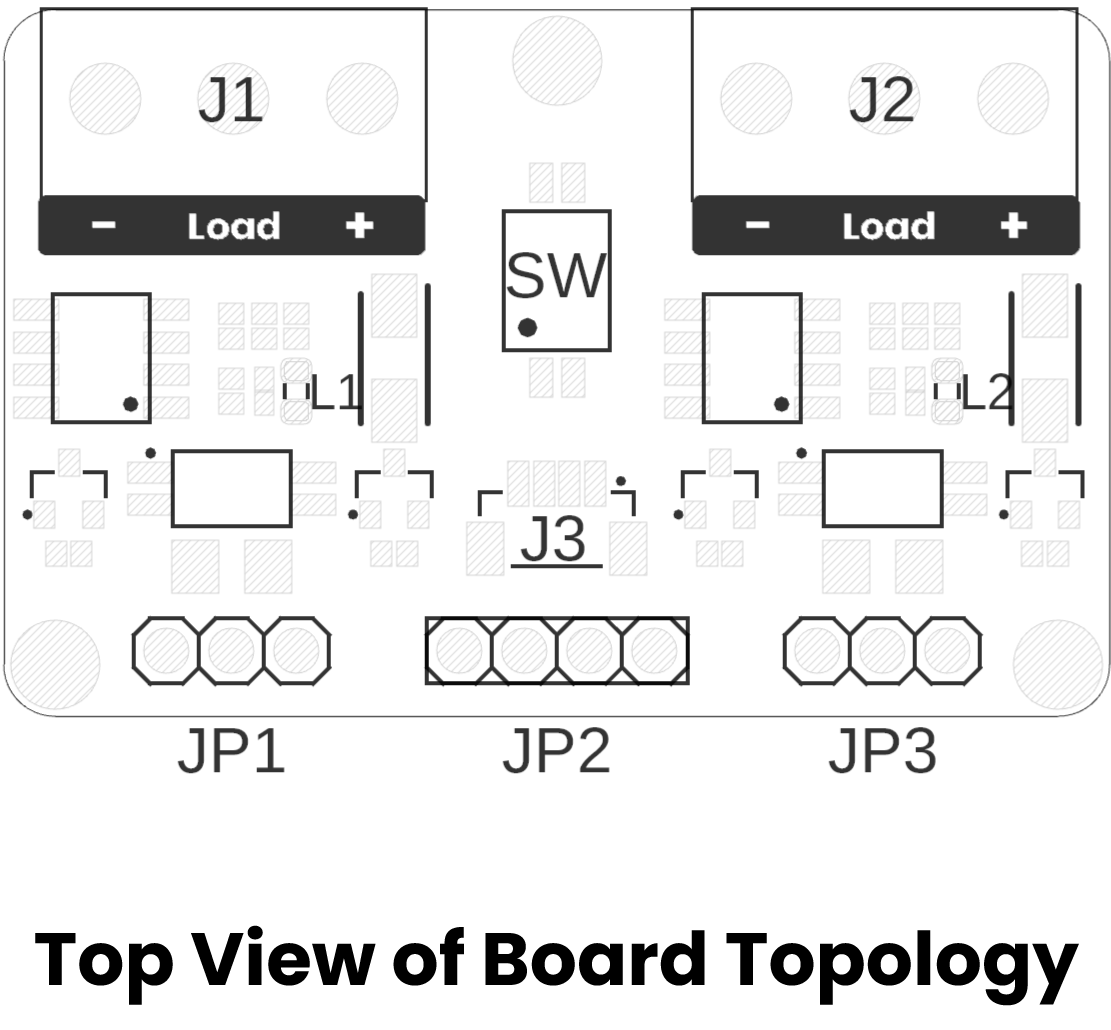
Topology
| Ref. | Description |
|---|---|
| SW | Dip Switch for coupling grounds |
| L1 | Channel 1 PWM LED |
| L2 | Channel 2 PWM LED |
| J1 | Screw Terminal Block for Channel 1 Load |
| J2 | Screw Terminal Block for Channel 2 Load |
| J3 | JST 1mm Connector for input signals |
| JP1 | Header for Channel 1 mode selection |
| JP2 | Header for input signals |
| JP3 | Header for Channel 2 mode selection |
Key Technical Specifications
- Input Voltage: -
- Output Current: -
- PWM Frequency: -
- Control Interface: JST 1mm Connector
Pinout
| Channel | Description | Control Pins | Power Pins | Load Terminals | Typical Use |
|---|---|---|---|---|---|
| PWM Channel 1 | MOSFET-based driver that amplifies MCU’s PWM output to switch a heavier external load | PWM1, GND | VCC1, GND | Load1 | DC motors, high-power LEDs, solenoids |
| PWM Channel 2 | Identical high-current PWM driver on a second channel | PWM2, GND | VCC2, GND | Load2 | Same as Channel 1 |
Dimensions
Topology
| Ref. | Description |
|---|---|
| SW | Dip Switch for coupling grounds |
| L1 | Channel 1 PWM LED |
| L2 | Channel 2 PWM LED |
| J1 | Screw Terminal Block for Channel 1 Load |
| J2 | Screw Terminal Block for Channel 2 Load |
| J3 | JST 1mm Connector for input signals |
| JP1 | Header for Channel 1 mode selection |
| JP2 | Header for input signals |
| JP3 | Header for Channel 2 mode selection |
Getting Started
This directory contains example code demonstrating how to use the PWM AO4410 2-Channel Output Module with different programming platforms.
Overview
The PWM AO4410 module amplifies PWM signals from microcontrollers to control external loads at higher voltages and currents. The examples show how to generate PWM signals that can be used for:
- Motor speed control
- High-power LED dimming
- Variable power output control
- Load switching applications
Available Examples
📁 C/Arduino Examples (examples/c/)
pwm.ino - LED Fade with PWM Control
Platform: Arduino IDE compatible boards (Arduino Uno, ESP32, etc.)
Description: This example demonstrates basic PWM control by fading an LED up and down. It shows how to:
- Configure a PWM output pin
- Generate variable duty cycle signals
- Monitor PWM duty cycle values via Serial Monitor
- Create smooth fading effects
Key Features:
- Uses
analogWrite()function for PWM generation - Configurable brightness step size
- Serial output for debugging and monitoring
- Simple fade up/down pattern
Hardware Connections:
- Connect PWM output pin (default: pin 9) to the module's PWM input
- Connect LED or load to the module's output terminals
- Ensure proper power supply connections
Usage:
- Open in Arduino IDE
- Select your board and port
- Upload the sketch
- Open Serial Monitor at 115200 baud
- Observe the LED fading and duty cycle values
📁 Python Examples (examples/python/)
pwm.py - MicroPython PWM Control
Platform: MicroPython (ESP32, Raspberry Pi Pico, etc.)
Description:
This MicroPython example shows how to control PWM outputs using the machine.PWM class. It demonstrates:
- High-resolution PWM control (16-bit duty cycle)
- Frequency configuration
- Percentage-based duty cycle calculation
- Continuous fading loop
Key Features:
- 16-bit duty cycle resolution (0-65535)
- Configurable PWM frequency (default: 1 kHz)
- Percentage calculation for easy understanding
- Continuous fade pattern
Hardware Connections:
- Connect PWM output pin (default: GPIO 2) to the module's PWM input
- Connect LED or load to the module's output terminals
- Ensure proper power supply connections
Usage:
- Upload to your MicroPython device
- Run the script
- Observe the console output showing duty cycle values
- Watch the connected load fade smoothly
Module Specifications
PWM Input Requirements
- Voltage: 3.3V or 5V logic levels
- Frequency Range: 1 Hz - 100 kHz (recommended)
- Duty Cycle: 0-100%
Output Characteristics
- Channels: 2 independent outputs
- Maximum Voltage: 30V DC
- Maximum Current: 4A per channel
- MOSFET: AO4410 N-channel
- Control: Low-side switching
Connection Guide
QWIIC/4-Pin Header Connections
| Pin | Function | Color (Standard) |
|---|---|---|
| 1 | GND | Black |
| 2 | VCC | Red |
| 3 | PWM1 | Blue |
| 4 | PWM2 | Yellow |
Screw Terminal Connections
- VIN+/VIN-: External power supply for loads
- OUT1+/OUT1-: Channel 1 output to load
- OUT2+/OUT2-: Channel 2 output to load
Safety Considerations
⚠️ Important Safety Notes:
- Always ensure proper power supply ratings
- Use appropriate wire gauge for current requirements
- Verify load compatibility before connection
- Never exceed maximum voltage/current ratings
- Ensure proper heat dissipation for high-power applications
Troubleshooting
Common Issues:
-
No PWM Output:
- Check PWM signal connections
- Verify code is generating PWM on correct pin
- Ensure proper power supply
-
Insufficient Load Power:
- Check external power supply voltage/current
- Verify load requirements are within module limits
-
Erratic Behavior:
- Check for proper grounding
- Verify PWM frequency is within acceptable range
- Ensure stable power supply
Getting Started
- Choose your platform (Arduino/C or MicroPython)
- Wire the module according to the connection guide
- Load the example code for your platform
- Modify parameters as needed for your application
- Test with a simple load (LED) before connecting high-power devices
Additional Resources
Support
For technical support and questions:
- GitHub Issues: Open an issue
- Website: uelectronics.com
- Documentation: Product Wiki
Examples
Arduino/C++ Examples
The following examples demonstrate various features of this development board.
pwm
// LED Fade + PWM duty print on Serial Monitor (simple version)

int LED_PIN = 9;      // PWM pin
int STEP    = 5;      // Brightness increment per step

void setup() {
  pinMode(LED_PIN, OUTPUT);
  Serial.begin(115200);          // Match this baud rate in the Serial Monitor
  delay(200);                    // Small pause to avoid garbage at start
  Serial.println("Starting fade...");
}

void loop() {
  // Fade up
  for (int duty = 0; duty <= 255; duty += STEP) {
    analogWrite(LED_PIN, duty);
    Serial.print("Duty: ");
    Serial.println(duty);
    delay(500);
  }
Python Examples
The following Python examples demonstrate usage with the sensor.
pwm
# LED Fade + PWM duty print

from machine import Pin, PWM
from time import sleep_ms

LED_PIN = 2          # Change to your LED pin
STEP    = 512        # Brightness increment per step (0..65535)
DELAY_MS = 500

pwm = PWM(Pin(LED_PIN), freq=1000)  # 1 kHz

MAX_DUTY = 65535

def print_duty(d):
    pct = d * 100.0 / MAX_DUTY
    print("Duty:", d, f"({pct:0.1f}%)")

# Fade loop
while True:
    # Fade up
Hardware Documentation & Resources
Product Datasheet
Official product documentation with complete technical specifications.
Product datasheet not found in hardware directory.
Hardware Resources
- Schematic Diagram - Complete circuit schematic
- Pinout Reference - Pin configuration details
Software Resources
- Getting Started Guide - Setup and first steps
- Code Examples - Arduino sketches and demos
- Development Setup - IDE configuration
External Links
- Source Code Repository - Complete project files
Quick Reference
| Resource | Description | Link |
|---|---|---|
| Schematic | Circuit diagram | |
| Pinout | Pin configuration | View |
| Examples | Code samples | View |
| Setup Guide | Getting started | View |
Hardware documentation extracted from project files.
License
MIT License
Copyright (c) 2025 UNIT-Electronics-MX
Permission is hereby granted, free of charge, to any person obtaining a copy of this software and associated documentation files (the "Software"), to deal in the Software without restriction, including without limitation the rights to use, copy, modify, merge, publish, distribute, sublicense, and/or sell copies of the Software, and to permit persons to whom the Software is furnished to do so, subject to the following conditions:
The above copyright notice and this permission notice shall be included in all copies or substantial portions of the Software.
THE SOFTWARE IS PROVIDED "AS IS", WITHOUT WARRANTY OF ANY KIND, EXPRESS OR IMPLIED, INCLUDING BUT NOT LIMITED TO THE WARRANTIES OF MERCHANTABILITY, FITNESS FOR A PARTICULAR PURPOSE AND NONINFRINGEMENT. IN NO EVENT SHALL THE AUTHORS OR COPYRIGHT HOLDERS BE LIABLE FOR ANY CLAIM, DAMAGES OR OTHER LIABILITY, WHETHER IN AN ACTION OF CONTRACT, TORT OR OTHERWISE, ARISING FROM, OUT OF OR IN CONNECTION WITH THE SOFTWARE OR THE USE OR OTHER DEALINGS IN THE SOFTWARE.
This project is licensed under the MIT License - see the LICENSE file for details.